![]() RedHawk8.4.x VNCとマルチタッチスクリーン(HTML) 2024.07.04
RedHawk8.4.x VNCとマルチタッチスクリーン(HTML) 2024.07.04
![]() RedHawk8.4.x TigerVNCのcapability ファイル(HTML) 2024.06.06
RedHawk8.4.x TigerVNCのcapability ファイル(HTML) 2024.06.06
![]() RedHawk8.4.x TigerVNCの設定(HTML) 2024.03.01
RedHawk8.4.x TigerVNCの設定(HTML) 2024.03.01
![]() RedHawk8.4.x TigerVNC と VirtualGLの併用設定(HTML) 2022.12.22
RedHawk8.4.x TigerVNC と VirtualGLの併用設定(HTML) 2022.12.22
![]() RedHawk8.4.x RealVNCの設定(HTML) 2022.12.22
RedHawk8.4.x RealVNCの設定(HTML) 2022.12.22
![]() RedHawk8.4.x TigerVNCとNvidia HeadLessの併用設定(HTML) 2023.01.16
RedHawk8.4.x TigerVNCとNvidia HeadLessの併用設定(HTML) 2023.01.16
![]() RedHawk8.4.x TigerVNC/GDM/XDMCPを利用してネットワークloginする方法(HTML) 2024.03.01
RedHawk8.4.x TigerVNC/GDM/XDMCPを利用してネットワークloginする方法(HTML) 2024.03.01
![]() RedHawk8.4.x TigerVNC/リアルタイムコンテナへ直接ネットワークloginする方法(HTML) 2024.03.01
RedHawk8.4.x TigerVNC/リアルタイムコンテナへ直接ネットワークloginする方法(HTML) 2024.03.01
VNC は、プロトコル上マウスとキーボードのイベント(シングルタッチイベント)しか伝送できません
VNCでマルチタッチのジェスチャをサポートするためには、touchegg
RHEL8ユーザランド用は、 rhel8_touchegg-2.0.17-1.x86_64.rpm
RedHawk8.4.nで確認した、TigerVNC のcapability ファイルは、/etc/pam.d/systemd-userです。(tigervncではありません)
vncログインでROLE権限付与するためには、/etc/pam.d/systemd-userファイルに"session required pam_capability.so"を追加します。
# echo "session required pam_capability.so" >> /etc/pam.d/systemd-user
RedHawk8.4.nで確認した、TigerVNC動作確認の手順を下記に示します。
1.インストールモジュール
ネットワークを接続し、以下のコマンドを入力します。
# dnf install tigervnc tigervnc-server tigervnc-server-module
あるいは、UPDATE BlueRay Disk(Rocky-8.4-Updates-x86_64)を挿入して、以下のコマンドを実行してください。
# dnf --disablerepo="*" --enablerepo="rocky-8.4-updates-media-AppStream rocky-8.4-updates-media-BaseOS" install tigervnc-server-module tigervnc-selinux tigervnc-server
以下のコマンドでも同様にインストール可能です。
    # cd /run/media/root/Rocky-8.4-Updates-x86_64/AppStream/Packages
    # dnf localinstall --disablerepo="*" \
    tigervnc-server-module-1.11.0-6.el8.x86_64.rpm \
    tigervnc-selinux-1.11.0-6.el8.noarch.rpm \
    tigervnc-server-1.11.0-6.el8.x86_64.rpm
2.vncユーザこの例では「vncuser1,vncuser2」がユーザ名です
    # useradd -m vncuser1
    # useradd -m vncuser2
    # fgrep vncuser /etc/passwd
    vncuser1:x:1001:1001::/home/vncuser1:/bin/bash
    vncuser2:x:1002:1002::/home/vncuser2:/bin/bash
/etc/tigervnc/vncserver.users ファイルを下記の様に変更します。
    # cat /etc/tigervnc/vncserver.users
    # TigerVNC User assignment
    #
    # This file assigns users to specific VNC display numbers.
    # The syntax is =. E.g.:
    #
    # :2=andrew
    # :3=lisa
    :2=vncuser1
    :3=vncuser2
注1:コンテナ内でVNCを利用する場合、ベアメタル側にもコンテナ内のユーザーと同一のユーザーが必要です。3.TigerVNCサーバ設定
3.1 /etc/tigervnc/vncserver-config-defaults ファイルの最下行にxvncのオプションを追加します。
このファイルは、Xvncを起動する際のオプションであり、man Xvnc(1)のオプション項目の指定です
    # tail -3 /etc/tigervnc/vncserver-config-defaults
    # Note: change this only when you know what are you doing
    session=gnome
    localhost
    ZlibLevel=9
    alwaysshared
注2:(session):session=gnomeをsession=plasmaに変更すると、kde plasmaでのセッションになります(当然kde plasmaをEPELからインストールする必要があります。)注3:(localhost):リモートネットワーク(localhost以外)で接続する場合には、「localhost」を記述しないでください。(下記6「vncポートがオープンしているかの確認」を参照
注4:(ZlibLevel):ZlibLevel=9を指定するとZRLE エンコーディングの Zlib 圧縮レベルを変更できます。設定値は 0~9 で、デフォルトは標準の圧縮レベル(6)が使用されます。
注5:(alwaysshared):クライアント指定の設定に関係なく、接続を常に共有として扱います。 デフォルトはオフです。
3.2 /usr/lib/systemd/system/vncserver@.serviceに下記の「Restart=on-success」を追加する(それ以外はデイフォルト)。
この追加で、vncサーバからログアウト後、vncserverが再起動します。
    # The vncserver service unit file
    #
    # Quick HowTo:
    # 1. Add a user mapping to /etc/tigervnc/vncserver.users.
    # 2. Adjust the global or user configuration. See the
    #    vncsession(8) manpage for details. (OPTIONAL)
    # 3. Run `systemctl enable vncserver@:.service`
    # 4. Run `systemctl start vncserver@:.service`
    #
    # DO NOT RUN THIS SERVICE if your local area network is
    # untrusted!  For a secure way of using VNC, you should
    # limit connections to the local host and then tunnel from
    # the machine you want to view VNC on (host A) to the machine
    # whose VNC output you want to view (host B)
    #
    # [user@hostA ~]$ ssh -v -C -L 590N:localhost:590M hostB
    #
    # this will open a connection on port 590N of your hostA to hostB's port 590M
    # (in fact, it ssh-connects to hostB and then connects to localhost (on hostB).
    # See the ssh man page for details on port forwarding)
    #
    # You can then point a VNC client on hostA at vncdisplay N of localhost and with
    # the help of ssh, you end up seeing what hostB makes available on port 590M
    #
    # Use "nolisten=tcp" to prevent X connections to your VNC server via TCP.
    #
    # Use "localhost" to prevent remote VNC clients connecting except when
    # doing so through a secure tunnel.  See the "-via" option in the
    # `man vncviewer' manual page.


    [Unit]
    Description=Remote desktop service (VNC)
    After=syslog.target network.target

    [Service]
    Type=forking
    ExecStartPre=+/usr/libexec/vncsession-restore %i
    ExecStart=/usr/libexec/vncsession-start %i
    PIDFile=/run/vncsession-%i.pid
    SELinuxContext=system_u:system_r:vnc_session_t:s0
    Restart=on-success

    [Install]
    WantedBy=multi-user.target
4.vncユーザのパスワード設定(「vncuser1」ユーザで実行します)
    # su - vncuser1
    ------------------------------------------------------------------------
            [vncuser1@localhost ~]$ vncpasswd
            Password:******
            Verify:*****
            Would you like to enter a view-only password (y/n)? n
            A view-only password is not used
            [vncuser1@localhost ~]$ exit
    ------------------------------------------------------------------------
    # su - vncuser2
	:
    # su - vncuser3
	:
5.vncサーバ起動と確認
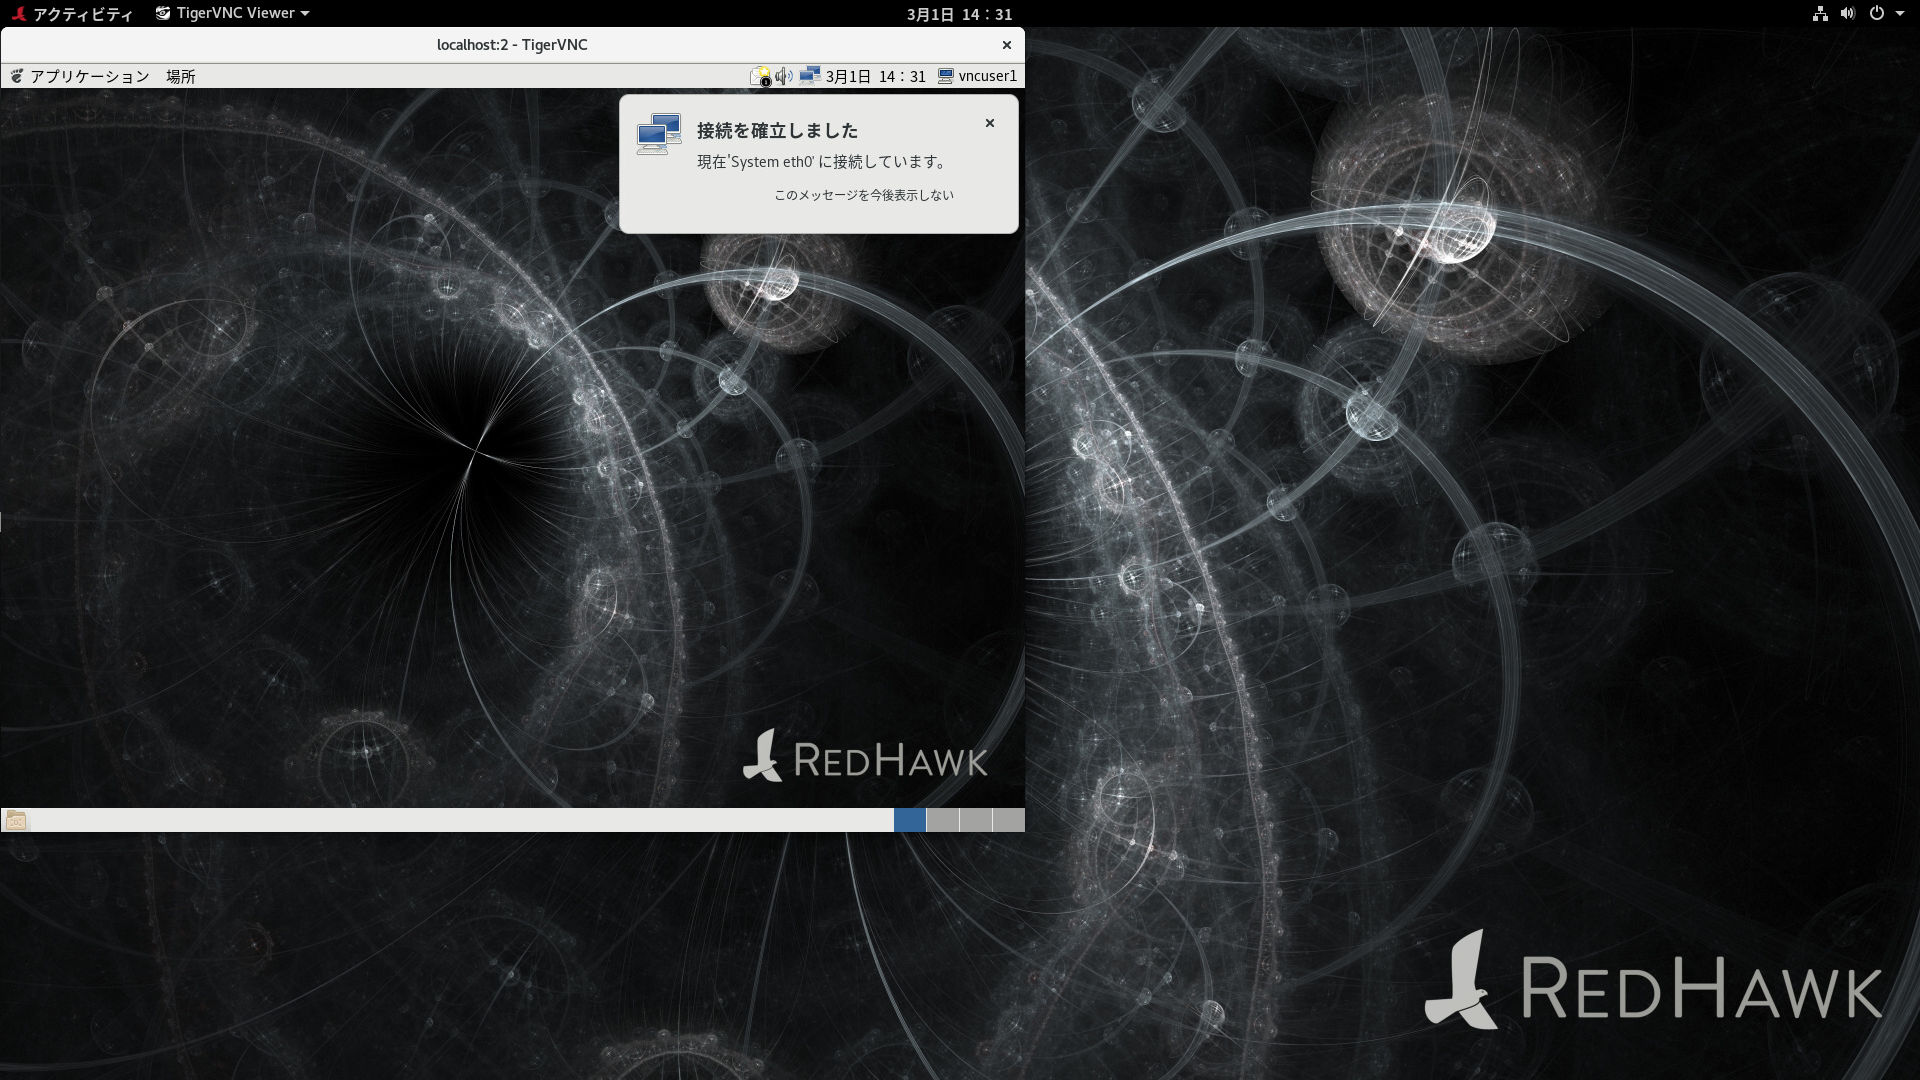
    # systemctl enable --now vncserver@:2
    Created symlink /etc/systemd/system/multi-user.target.wants/vncserver@:2.service → /usr/lib/systemd/system/vncserver@.service.
	:
    # systemctl enable --now vncserver@:3
	:
    # systemctl enable --now vncserver@:4

    # systemctl daemon-reload
    # systemctl start vncserver@:2
    # systemctl status vncserver@:2
    ● vncserver@:2.service - Remote desktop service (VNC)
       Loaded: loaded (/usr/lib/systemd/system/vncserver@.service; enabled; vendor preset: disabled)
       Active: active (running) since Tue 2022-11-29 10:22:30 JST; 11min ago
     Main PID: 5642 (vncsession)
        Tasks: 0 (limit: 298436)
       CGroup: /system.slice/system-vncserver.slice/vncserver@:2.service
               ? 5642 /usr/sbin/vncsession redhawk8.4 :2

    11月 29 10:22:30 localhost.localdomain systemd[1]: Starting Remote desktop service (VNC)...
    11月 29 10:22:30 localhost.localdomain systemd[1]: Started Remote desktop service (VNC).

    # systemctl start vncserver@:3
    # systemctl status vncserver@:3
	:
    # systemctl start vncserver@:4
    # systemctl status vncserver@:4
	:
6. vncポートがオープンしているかの確認6.1 /etc/tigervnc/vncserver-config-defaults ファイルにlocalhostが記述されている場合(外部アクセスポートは閉じています)
注:ポート番号は「5900+ディスプレイ番号」になり、ディスプレイ番号:1はgdm-x-sessionが利用しているため5902からの利用になります。
# nmap IP_ADDRESS -p 5900-5999
Starting Nmap 7.70 ( https://nmap.org ) at 2022-11-30 15:41 JST
Nmap scan report for IP_ADDRESS
Host is up (0.0000060s latency).
Not shown: 99 closed ports
PORT     STATE SERVICE
5900/tcp open  vnc
Nmap done: 1 IP address (1 host up) scanned in 1.51 seconds

# nmap localhost -p 5900-5999
Starting Nmap 7.70 ( https://nmap.org ) at 2022-11-30 15:41 JST
Nmap scan report for localhost (127.0.0.1)
Host is up (0.0000060s latency).
Other addresses for localhost (not scanned): ::1
Not shown: 96 closed ports
PORT     STATE SERVICE
5900/tcp open  vnc
5902/tcp open  vnc-2
5903/tcp open  vnc-3
5904/tcp open  unknown

Nmap done: 1 IP address (1 host up) scanned in 1.51 seconds
6.2 /etc/tigervnc/vncserver-config-defaults ファイルにlocalhostが記述されていない場合(外部アクセスポートは開いています)
# nmap IP_ADDRESS -p 5900-5999
Starting Nmap 7.70 ( https://nmap.org ) at 2022-11-30 15:39 JST
Nmap scan report for IP_ADDRESS
Host is up (0.0000060s latency).
Not shown: 96 closed ports
PORT     STATE SERVICE
5900/tcp open  vnc
5902/tcp open  vnc-2
5903/tcp open  vnc-3
5904/tcp open  unknown


# nmap localhost -p 5900-5999
Starting Nmap 7.70 ( https://nmap.org ) at 2022-11-30 15:41 JST
Nmap scan report for localhost (127.0.0.1)
Host is up (0.0000060s latency).
Other addresses for localhost (not scanned): ::1
Not shown: 96 closed ports
PORT     STATE SERVICE
5900/tcp open  vnc
5902/tcp open  vnc-2
5903/tcp open  vnc-3
5904/tcp open  unknown

Nmap done: 1 IP address (1 host up) scanned in 1.51 seconds
7. 追加処置7.1 ログインした時、「カラープロファイルを作成しますには認証が必要です」 ダイアログを消す方法
/etc/polkit-1/localauthority/50-local.d/45-allow-colord.pkla というファイルを作り、以下のように設定する。
    # cat /etc/polkit-1/localauthority/50-local.d/45-allow-colord.pkla
    [Allow Colord all Users]
    Identity=unix-user:*
    Action=org.freedesktop.color-manager.create-device;org.freedesktop.color-manager.create-profile;org.freedesktop.color-manager.delete-device;org.freedesktop.color-manager.delete-profile;org.freedesktop.color-manager.modify-device;org.freedesktop.color-manager.modify-profile
    ResultAny=no
    ResultInactive=no
    ResultActive=yes
7.2 ログインした時、"Authentication required to refresh system repositories" ダイアログを消す方法/etc/polkit-1/localauthority/50-local.d/46-allow-update-repo.pkla というファイルを作り、以下のように設定する。
    # cat /etc/polkit-1/localauthority/50-local.d/46-allow-update-repo.pkla
    [Allow Package Management all Users]
    Identity=unix-user:*
    Action=org.freedesktop.packagekit.system-sources-refresh
    ResultAny=yes
    ResultInactive=yes
    ResultActive=yes
7.3 kde plasmaでログインした時、"System policy prevents control of network connections" ダイアログを消す方法/etc/polkit-1/localauthority/50-local.d/50-allow-network-manager.pkla というファイルを作り、以下のように設定する。
    # cat /etc/polkit-1/localauthority/50-local.d/50-allow-network-manager.pkla
    [Network Manager all Users]
    Identity=unix-user:*
    Action=org.freedesktop.NetworkManager.settings.modify.system;org.freedesktop.NetworkManager.network-control
    ResultAny=no
    ResultInactive=no
    ResultActive=yes
7.4 "Authentication required to access the PC/SC daemon" ダイアログを消す方法以下のコマンドを実行する。
# systemctl stop pcscd.socket
# systemctl stop pcscd
# systemctl disable pcscd.socket
# systemctl disable pcscd.service
7.5 vncuserを複数登録した場合にログイン画面に多くのユーザ一覧が表示されるため、これを無効化する方法(1) 下記の内容で、/etc/dconf/profile/gdm ファイルを作成します。
user-db:user
system-db:gdm
file-db:/usr/share/gdm/greeter-dconf-defaults
(2) 下記の内容で、/etc/dconf/db/gdm.d/00-login-screen ファイルを作成します。
[org/gnome/login-screen]
disable-user-list=true
(3)システムデータベースを更新する
# dconf update
8.起動試験例注意:ログイン名が同じものを複数起動した場合、同一セッションを同時に別ウィンドウで操作する事になります。
また、vncviewerをgnome-terminalから起動後、gnome-terminalのメニュー操作が出来なくなることがあります。
この場合、gnome-terminal で、マウスの右ボタンを右クリックして「メニューバーを表示」のチェックボックスをOFF/ONすると動作が復活します。
8.1 異なるユーザでログインする例
    # vncviewer -passwd /home/vncuser1/.vnc/passwd --shared localhost:2
または
    # vncviewer -passwd /home/vncuser2/.vnc/passwd --shared localhost:3
8.2 デスクトップユーザでログインする例注意:デーモンは停止してください
# systemctl stop vncserver@:2
# vncserver :2

WARNING: vncserver has been replaced by a systemd unit and is now considered deprecated and removed in upstream.
Please read /usr/share/doc/tigervnc/HOWTO.md for more information.

New 'localhost.localdomain:2 (root)' desktop is localhost.localdomain:2

Starting applications specified in /root/.vnc/xstartup
Log file is /root/.vnc/localhost.localdomain:2.log

# vncviewer -passwd ~/.vnc/passwd --shared localhost:2

TigerVNC Viewer 64-bit v1.12.0
Built on: 2022-10-02 04:50
Copyright (C) 1999-2021 TigerVNC Team and many others (see README.rst)
See https://www.tigervnc.org for information on TigerVNC.

Thu Dec 22 10:02:15 2022
 DecodeManager: Detected 4 CPU core(s)
 DecodeManager: Creating 4 decoder thread(s)
 CConn:       Connected to host localhost port 5902
 CConnection: Server supports RFB protocol version 3.8
 CConnection: Using RFB protocol version 3.8
 CConnection: Choosing security type VeNCrypt(19)
 CVeNCrypt:   Choosing security type TLSVnc (258)
 CConn:       Using pixel format depth 24 (32bpp) little-endian rgb888
 CConnection: Enabling continuous updates

Thu Dec 22 10:02:25 2022
 CConn:       End of stream
9.vnc起動画面(このXサーバはNvidiaGLXを利用しています。)下記の様に、vncサーバでOpenGLも動作します。
![[TigerVNC.png]](IMAGES/TigerVNC.png "RedHawk Linux 8.4 TigerVNC")
10. ユーザ個別のサーバー設定ファイル
ユーザ個別のサーバー設定は、/etc/tigervnc/vncserver-config-defaultsと同様の内容を~/.vnc/configに記述します。
引数が必要な場合は、「geometry=2000x1200」または「securitytypes=vncauth,tlsvnc」のように、オプションと引数を等号で区切ります。
引数のないオプションは、"localhost" や "alwaysshare" のように、単に 1 つの単語としてリストされます。
特別なオプション session を使用して、開始するセッションの種類を制御できます。
これは、/usr/share/xsessions/*.desktop 内のファイルの 1 つと一致する必要があります。
例えば。 「gnome.desktop」というファイルがある場合、「session=gnome」はそのセッション タイプを使用するように設定されます。
10.1 ユーザ個別のサーバー設定ファイル例
下記に、「Motif ウィンドウマネージャ」を利用する例を示します。(別途、dnf install motif を実行しておいて下さい)
(1) 下記の内容で、/usr/share/xsessions/mwm.desktop ファイルを作成します。
	[Desktop Entry]
	Encoding=UTF-8
	Name=mwm
	Comment=
	Exec=mwm-session
	Icon=
	Type=Apprication
(2) 下記の内容で、/usr/bin/mwm-session ファイルを作成します。
	#!/bin/bash
	#export __GL_SYNC_TO_VBLANK=0
	#export __GLX_VENDOR_LIBRARY_NAME=nvidia
	xsetroot -solid gray20
	####################################################
	# 以下の記述はかな漢字変換を利用する場合に必要です
	####################################################
	export LANG=ja_JP.UTF-8
	export GDM_LANG=ja_JP.UTF-8
	####################################################
	# 仮想モードでは、['<Super>+space']による、かな漢字変換エンジンへの切り替えが、
	# ホスト側のウィンドウマネージャによって、アクセプトされ、仮想モード側に認識されないため、
	# 別のキーバイディングに変更します。
	####################################################
	gsettings set org.freedesktop.ibus.general.hotkey trigger "['<Ctrl>+space', 'Zenkaku_Hankaku', 'Alt+Kanji', 'Alt+grave', 'Hangul', 'Alt+Release+Alt_R']"
	gsettings set org.freedesktop.ibus.general.hotkey triggers "['<Ctrl>space']"
	####################################################
	# かな漢字変換エンジンを起動します
	####################################################
	/usr/bin/ibus-daemon -r --xim -d
	/usr/libexec/ibus-engine-kkc --ibus &
	/usr/libexec/ibus-engine-simple &
	####################################################
	# Motif ウィンドウマネージャを起動します
	####################################################
	exec /usr/bin/mwm
/usr/bin/mwm-session ファイルに実行権を付与します。
# chmod 755 /usr/bin/mwm-session
(3) ~/.vnc/xstartupから起動する場合は下記の下記の内容ファイルを作成します。
	#!/bin/sh
	unset SESSION_MANAGER
	unset DBUS_SESSION_BUS_ADDRESS
	#export __GL_SYNC_TO_VBLANK=0
	#export __GLX_VENDOR_LIBRARY_NAME=nvidia
	xsetroot -solid gray20
	####################################################
	# 以下の記述はかな漢字変換を利用する場合に必要です
	####################################################
	export LANG=ja_JP.UTF-8
	export GDM_LANG=ja_JP.UTF-8
	####################################################
	# 仮想モードでは、['+space']による、かな漢字変換エンジンへの切り替えが、
	# ホスト側のウィンドウマネージャによって、アクセプトされ、仮想モード側に認識されないため、
	# 別のキーバイディングに変更します。
	####################################################
	gsettings set org.freedesktop.ibus.general.hotkey trigger "['+space', 'Zenkaku_Hankaku', 'Alt+Kanji', 'Alt+grave', 'Hangul', 'Alt+Release+Alt_R']"
	gsettings set org.freedesktop.ibus.general.hotkey triggers "['space']"
	####################################################
	# かな漢字変換エンジンを起動します
	####################################################
	/usr/bin/ibus-daemon -r --xim -d
	/usr/libexec/ibus-engine-kkc --ibus &
	/usr/libexec/ibus-engine-simple &
	####################################################
	# Motif ウィンドウマネージャを起動します
	####################################################
	#vglrun -d :1 /usr/bin/mwm
	/usr/bin/mwm
	vncserver -kill $DISPLAY
~/.vnc/xstartup ファイルに実行権を付与します。
# chmod 755 ~/.vnc/xstartup
(4) ~/.vnc/config ファイルを作成します。以下で有効な設定は、session=mwmです。
	#session=gnome
	#session=gnome-classic
	#session=mate
	#session=plasma
	session=mwm
(5) Motif起動画面
下記の様に、仮想vncサーバ上でMotif/xterm/かな漢字変換も動作します。
![[TigerVNCmwm.png]](IMAGES/TigerVNCmwm.png "RedHawk Linux 8.4 TigerVNC & mwm")
11. TigerVNC/GDM/XDMCPを利用してネットワークloginする方法 2024.03.01
注意1: gdm 以外では動作しません。
注意2: ~/.vnc/xstartupからの起動は動作しません。
参考サイト
11.1 以下の手順に従って、GDMのX Display Manager Control Protocol (XDMCP) を有効にする
下記内容で、/etc/gdm/custom.conf ファイルを設定する。 (/etc/gdm/custom.confの設定詳細)
	# GDM configuration storage
	[daemon]
	InitialSetupEnable=False
	[security]
	AllowRemoteRoot=true
	DisallowTCP=false
	[xdmcp]
	Enable=true
	MaxSessions=100
	[greeter]
	[chooser]
	[debug]
11.2 systemdサービスを利用する方法
11.2.1 vncserver@.serviceと
vncserver.socket
をダウンロードして、/etc/system/ディレクトリにコピーする。
11.2.2 サービスを有効にする。
# cp vncserver@.service vncserver.socket /etc/systemd/system
11.2.3 サービスを確認する。
	# systemctl enable vncserver.socket
	Created symlink /etc/systemd/system/sockets.target.wants/vncserver.socket → /etc/systemd/system/vncserver.socket.
	# systemctl start vncserver.socket
	# systemctl status vncserver.socket
	● vncserver.socket - VNCserver Socket
	   Loaded: loaded (/etc/systemd/system/vncserver.socket; enabled; vendor preset: disabled)
	   Active: active (listening) since Fri 2024-03-01 16:07:55 JST; 9s ago
	   Listen: [::]:5900 (Stream)
	 Accepted: 0; Connected: 0;
	   CGroup: /system.slice/vncserver.socket

	 3月 01 16:07:55 localhost systemd[1]: Listening on VNCserver Socket.
11.2.3 11.4 動作確認へ。
	# nmap localhost -p 5900-5999
	Starting Nmap 7.70 ( https://nmap.org ) at 2024-03-01 16:12 JST
	Nmap scan report for localhost (127.0.0.1)
	Host is up (0.0000060s latency).
	Other addresses for localhost (not scanned): ::1
	Not shown: 99 closed ports
	PORT     STATE SERVICE
	5900/tcp open  vnc

	Nmap done: 1 IP address (1 host up) scanned in 1.52 seconds
11.3 xinetdサービスを利用する方法
標準インストールでは、xinetd がインストールされていません。
また、/etc/services ファイルのポート5900/tcpは Remote Framebuffer 用に予約されています。
このため以下の手順に従って、xinetdサービスを作成します。
注意1: 3.1の/etc/tigervnc/vncserver-config-defaults ファイルからlocalhostを削除してください。
11.3.1 xinetdをインストールする
11.3.2 /etc/services ファイルの最後に次の行を追加する。
# dnf install xorg-x11-fonts-Type1 xinetd
11.3.3 下記内容で、/etc/xinetd.d/vncserver ファイルを作成する。
vncserver 5900/tcp # VNC & GDM
11.3.4 以下の手順に従って、xinetd を有効にする
	service vncserver
	{
	   disable     = no
	   socket_type = stream
	   protocol    = tcp
	   wait        = no
	   user        = nobody
	   server      = /usr/bin/Xvnc
	   server_args = -inetd -once -query localhost -geometry 1024x768 -depth 16 -securitytypes=none
	   type        = UNLISTED
	   port        = 5900
	}
	# systemctl enable xinetd.service
	# systemctl start xinetd.service
	# systemctl status xinetd.service
	● xinetd.service - Xinetd A Powerful Replacement For Inetd
	   Loaded: loaded (/usr/lib/systemd/system/xinetd.service; enabled; vendor preset: enabled)
	   Active: active (running) since Thu 2024-02-29 11:25:10 JST; 4s ago
	     Docs: man:xinetd
	           man:xinetd.conf
	           man:xinetd.log
	  Process: 6559 ExecStart=/usr/sbin/xinetd -stayalive -pidfile /var/run/xinetd.pid (code=exited, status=0/SUCCESS)
	 Main PID: 6560 (xinetd)
	    Tasks: 1 (limit: 299009)
	   CGroup: /system.slice/xinetd.service
	           └─6560 /usr/sbin/xinetd -stayalive -pidfile /var/run/xinetd.pid

	 2月 29 11:25:10 localhost xinetd[6560]: removing daytime
	 2月 29 11:25:10 localhost xinetd[6560]: removing discard
	 2月 29 11:25:10 localhost xinetd[6560]: removing discard
	 2月 29 11:25:10 localhost xinetd[6560]: removing echo
	 2月 29 11:25:10 localhost xinetd[6560]: removing echo
	 2月 29 11:25:10 localhost xinetd[6560]: removing tcpmux
	 2月 29 11:25:10 localhost xinetd[6560]: removing time
	 2月 29 11:25:10 localhost xinetd[6560]: removing time
	 2月 29 11:25:10 localhost xinetd[6560]: xinetd Version 2.3.15 started with loadavg labeled-networking options compiled in.
	 2月 29 11:25:10 localhost xinetd[6560]: Started working: 1 available service

	# nmap IP_ADDRESS -p 177

	# Starting Nmap 7.70 ( https://nmap.org ) at 2024-02-29 11:43 JST
	# Nmap scan report for IP_ADDRESS
	# Host is up (0.000039s latency).

	# PORT    STATE  SERVICE
	# 177/tcp closed xdmcp

	Nmap done: 1 IP address (1 host up) scanned in 0.28 seconds

	# nmap IP_ADDRESS -p 5900
	Starting Nmap 7.70 ( https://nmap.org ) at 2024-02-29 11:48 JST
	Nmap scan report for IP_ADDRESS
	Host is up (0.000040s latency).

	PORT     STATE SERVICE
	5900/tcp open  vnc

	Nmap done: 1 IP address (1 host up) scanned in 0.27 seconds
11.4 以下の手順に従って、動作確認する
14.1 ローカルホストからlinuxのvncviewerを利用する場合
# vncviewer -RemoteResize=0 -geometry 1024x768+0+0 --shared IP_ADDRESS:5900
![[x11-vnclogin.png]](IMAGES/x11-TigerVNC.png "X11 Tiger VNC Viewer login")
14.2 WindowsホストからTigerVNC vererを利用する場合
![[vnclogin.png]](IMAGES/vnclogin.png "Windows Tiger VNC Viewer login")
![[WindowsTigerVNC.png]](IMAGES/WindowsTigerVNC.png "Windows Tiger VNC Viewer")
RealVNC(Homeエディション、フリートライアル版)を https://www.realvnc.com/en/connect/download/vnc からダウンロード/インストールして、RedHawk8.4で正常動作することを確認できましたので、参考情報としてお知らせします。
ダウンロードして、試験したものは下記のパッケージです。
VNC-Server-6.11.0-Linux-x64.rpm
VNC-Viewer-6.22.826-Linux-x64.rpm
1.RealVNCは、下記パッケージを必要とするので予めインストールしておきます。
UPDATE BlueRay Disk(Rocky-8.4-Updates-x86_64)を挿入して、以下のコマンドを実行してください。
仮想モードで必要になるxorg-x11-drv-dummyパッケージもインストールしておきます。
# cd /run/media/root/Rocky-8.4-Updates-x86_64/AppStream/Packages
# dnf --disablerepo="*" localinstall \
xterm-331-1.el8_3.2.x86_64.rpm  \
xterm-resize-331-1.el8_3.2.x86_64.rpm \
xorg-x11-fonts-misc-7.5-19.el8.noarch.rpm \
xorg-x11-drv-dummy-0.3.7-6.el8.1.x86_64.rpm
2.TigerVNCをインストールしている場合、TigerVNCのデーモンを停止します。
# systemctl stop vncserver@:2
# systemctl disable vncserver@:2
Removed /etc/systemd/system/multi-user.target.wants/vncserver@:2.service.
:
3.依存関係の解決ダウンロードしたRealVNCのパッケージですが、以下の様な依存関係になっています。
# dnf deplist VNC-Server-6.11.0-Linux-x64.rpm|grep provider|uniq
メタデータの期限切れの最終確認: 0:50:28 時間前の 2022年12月07日 08時20分54秒 に実施しました。
   provider: bash-4.4.20-4.el8_6.x86_64
   provider: glibc-2.28-211.el8.x86_64
   provider: libX11-1.6.8-5.el8.x86_64
   provider: libXext-1.3.4-1.el8.x86_64
   provider: libXtst-1.2.3-7.el8.x86_64
   provider: libgcc-8.5.0-15.el8.x86_64
   provider: glibc-2.28-211.el8.i686
   provider: xterm-331-1.el8_3.2.x86_64
RedHawk8.4をインストールした状態は、以下の版になり、幾つかのパッケージの版が異なります。
    bash-4.4.20-1.el8_4.x86_64
    glibc-2.28-151.el8.x86_64
    libX11-1.6.8-4.el8.x86_64
    libXext-1.3.4-1.el8.x86_64
    libXtst-1.2.3-7.el8.x86_64
    libgcc-8.4.1-1.el8.x86_64
    glibc-2.28-151.el8.x86_64
    glibc-2.28-151.el8.i686
    xterm-331-1.el8_3.2.x86_64
このため、これらの版の異なるパッケージをアップデートします。インターネットに接続出来る環境であれば、以下の様に実行してください。
# dnf update bash-4.4.20-4.el8_6.x86_64 \
glibc-2.28-211.el8.x86_64 \
libX11-1.6.8-5.el8.x86_64 \
libXext-1.3.4-1.el8.x86_64 \
libXtst-1.2.3-7.el8.x86_64 \
libgcc-8.5.0-15.el8.x86_64 \
glibc-2.28-211.el8.i686 \
xterm-331-1.el8_3.2.x86_64 \
xorg-x11-drv-dummy-0.3.7-6.el8.1.x86_64
不足パッケージをここからダウンロードすることも出来ます。下記の様にインストールしてください。
# tar xvfz RealVNC_updates.tar.gz
# dnf --allowerasing --disablerepo="*" localinstall updates/*.rpm
4. ダウンロードした、RealVNCを --allowerasing オプションを付与してインストールします。この時、RealVNCと競合する、TigerVNCパッケージは削除されます。(--allowerasing:依存関係を解決するためにインストール済みパッケージの削除を許可する)
# dnf --disablerepo="*" --allowerasing localinstall \
VNC-Server-6.11.0-Linux-x64.rpm \
VNC-Viewer-6.22.826-Linux-x64.rpm
依存関係が解決しました。
================================================================================
 パッケージ             Arch       バージョン           リポジトリー      サイズ
================================================================================
インストール:
 realvnc-vnc-server     x86_64     6.11.0.47988-1       @commandline       14 M
 realvnc-vnc-viewer     x86_64     6.22.826.47988-1     @commandline      3.8 M
依存関係パッケージの削除:
 tigervnc               x86_64     1.11.0-6.el8         @AppStream        881 k
 tigervnc-server        x86_64     1.11.0-6.el8         @@commandline     653 k

トランザクションの概要
================================================================================
インストール  2 パッケージ
削除          2 パッケージ

合計サイズ: 17 M
これでよろしいですか? [y/N]: y
パッケージのダウンロード:
トランザクションの確認を実行中
トランザクションの確認に成功しました。
トランザクションのテストを実行中
トランザクションのテストに成功しました。
トランザクションを実行中
  準備             :                                                        1/1
  scriptletの実行中: realvnc-vnc-viewer-6.22.826.47988-1.x86_64             1/1
  インストール中   : realvnc-vnc-viewer-6.22.826.47988-1.x86_64             1/4
  scriptletの実行中: realvnc-vnc-viewer-6.22.826.47988-1.x86_64             1/4
  インストール中   : realvnc-vnc-server-6.11.0.47988-1.x86_64               2/4
  scriptletの実行中: realvnc-vnc-server-6.11.0.47988-1.x86_64               2/4
** Moving /usr/bin/Xvnc to /usr/bin/Xvnc.conflict
** Moving /usr/share/man/man1/Xvnc.1.gz to /usr/share/man/man1/Xvnc.1.gz.conflict
** Moving /usr/bin/vncpasswd to /usr/bin/vncpasswd.conflict
** Moving /usr/share/man/man1/vncpasswd.1.gz to /usr/share/man/man1/vncpasswd.1.gz.conflict
Testing if SELinux enabled... [Disabled]
Updating /etc/pam.d/vncserver

NOTICE: common configuration in /etc/pam.d contains the following modules:
   pam_faildelay.so
   pam_usertype.so
   pam_localuser.so
   pam_usertype.so
   pam_sss.so
   pam_faildelay.so
   pam_fprintd.so
   pam_usertype.so
   pam_localuser.so
   pam_usertype.so
   pam_sss.so
The default vncserver PAM configuration only enables pam_unix. See
`man vncinitconfig' for details on any manual configuration required.

Looking for font path... catalogue:/etc/X11/fontpath.d,built-ins (from xset).
Generating private key... done
Installed systemd unit for VNC Server in Service Mode daemon
Start or stop the service with:
  systemctl (start|stop) vncserver-x11-serviced.service
Mark or unmark the service to be started at boot time with:
  systemctl (enable|disable) vncserver-x11-serviced.service

Installed systemd unit for VNC Server in Virtual Mode daemon
Start or stop the service with:
  systemctl (start|stop) vncserver-virtuald.service
Mark or unmark the service to be started at boot time with:
  systemctl (enable|disable) vncserver-virtuald.service

Installed firewalld service configuration. To enable access to VNC services from the public zone, use the following commands:
For VNC Server in Service Mode:
  firewall-cmd --zone=public --permanent --add-service=vncserver-x11-serviced
For VNC Server in Virtual Mode daemon:
  firewall-cmd --zone=public --permanent --add-service=vncserver-virtuald

  scriptletの実行中: tigervnc-server-1.11.0-6.el8.x86_64                    3/4
  削除             : tigervnc-server-1.11.0-6.el8.x86_64                    3/4
警告: /etc/tigervnc/vncserver.users は /etc/tigervnc/vncserver.users.rpmsave として保存されました。
警告: /etc/tigervnc/vncserver-config-defaults は /etc/tigervnc/vncserver-config-defaults.rpmsave として保存されました。

  scriptletの実行中: tigervnc-server-1.11.0-6.el8.x86_64                    3/4
  削除             : tigervnc-1.11.0-6.el8.x86_64                           4/4
  scriptletの実行中: tigervnc-1.11.0-6.el8.x86_64                           4/4
  検証             : realvnc-vnc-server-6.11.0.47988-1.x86_64               1/4
  検証             : realvnc-vnc-viewer-6.22.826.47988-1.x86_64             2/4
  検証             : tigervnc-1.11.0-6.el8.x86_64                           3/4
  検証             : tigervnc-server-1.11.0-6.el8.x86_64                    4/4
Installed products updated.

インストール済み:
  realvnc-vnc-server-6.11.0.47988-1.x86_64
  realvnc-vnc-viewer-6.22.826.47988-1.x86_64
削除しました:
  tigervnc-1.11.0-6.el8.x86_64        tigervnc-server-1.11.0-6.el8.x86_64

完了しました!
5.起動試験例5.1 vncserver-x11
インストール時のメッセージに従ってデーモンを起動します。(SELinux、firewalld は利用していない前提です)
    # systemctl enable --now vncserver-x11-serviced.service
    Created symlink /etc/systemd/system/multi-user.target.wants/vncserver-x11-serviced.service → /usr/lib/systemd/system/vncserver-x11-serviced.service.
この後、インターネットを接続し、ライセンス認証を行えば実行できます(下記 赤× をクリックし、VNC Server - Information Center」「Messages」タブの [Resolve]ボタンをクリックしてください。
![[RealVNC.png]](IMAGES/RealVNC.png "RedHawk Linux 8.4 RealVNC")
5.2 vncserver-virtual
5.2.1 設定ファイルの生成
上記realvnc-vnc-serverのインストール時に"vncinitconfig -install-defaults"が自動実行されていますが、このコマンドでは、 -register-SELinux、-enable-system-xorg、および -disable-system-xorg は、実行されていません。
このため、下記コマンドを実行して、仮想モードで VNC サーバーの SystemXorg を有効にします。
root として実行してすべてのユーザーに対して有効にするか、通常のユーザーとして実行してそのユーザーのみに対して有効にします。
SystemXorg が有効になっている場合、仮想モードの VNC サーバーは、Xvnc の代わりにシステムにインストールされている Xorg を使用します。
# vncinitconfig -enable-system-xorg

You may be prompted to authenticate to create a color managed device when
connecting to virtual sessions. This can be avoided by adding a PolicyKit .pkla
file to /etc/polkit-1/localauthority/50-local.d that allows all users to
access colord by default.
Add a .pkla file to grant colord access to all users? [y/n]: y

Enabling SystemXorg for all users.
(re-run as a normal user to enable for just that user)
Are you sure? [y/n]: y

SystemXorg enabled.
5.2.2 vncserver-x11-serviced.serviceが起動している事を確認します。
# systemctl status vncserver-x11-serviced.service
● vncserver-x11-serviced.service - VNC Server in Service Mode daemon
   Loaded: loaded (/usr/lib/systemd/system/vncserver-x11-serviced.service; disabled; vendor preset: disabled)
   Active: active (running) since Mon 2022-12-12 08:51:19 JST; 1s ago
 Main PID: 5037 (vncserver-x11-s)
    Tasks: 6 (limit: 299223)
   CGroup: /system.slice/vncserver-x11-serviced.service
           ├─5037 /usr/bin/vncserver-x11-serviced -fg
           ├─5038 /usr/bin/vncserver-x11-core -service
           ├─5052 /usr/bin/vncagent service 0
           ├─5054 /usr/bin/vncserverui service 0
           └─5062 /usr/bin/vncserverui -statusicon 0

12月 12 08:51:19 localhost.localdomain systemd[1]: Started VNC Server in Service Mode daemon.
12月 12 08:51:19 localhost.localdomain vncserver-x11[5038]: ServerManager: Server started
12月 12 08:51:19 localhost.localdomain vncserver-x11[5038]: ConsoleDisplay: Found running X server (pid=1737, binary=/usr/libexec/Xorg)
5.2.3 vncserver-virtualdが起動している事を確認します。注意:vncserver-virtualdからの起動確認はエンタープライズサブスクリプションが必要です。
ここではマニュアル起動の確認方法を示しますので、vncserver-virtualdの起動は行わなくても構いません。
# systemctl start vncserver-virtuald
# systemctl status vncserver-virtuald
● vncserver-virtuald.service - VNC Server in Virtual Mode daemon
   Loaded: loaded (/usr/lib/systemd/system/vncserver-virtuald.service; disabled; vendor preset: disabled)
   Active: active (running) since Mon 2022-12-12 08:55:58 JST; 5min ago
 Main PID: 5145 (vncserver-virtu)
    Tasks: 1 (limit: 299223)
   CGroup: /system.slice/vncserver-virtuald.service
           └─5145 /usr/bin/vncserver-virtuald -fg

12月 12 08:55:58 localhost.localdomain systemd[1]: Started VNC Server in Virtual Mode daemon.
12月 12 08:55:58 localhost.localdomain vncserver-virtuald[5145]: main: started
vncserver-virtuald.serviceが起動している場合、下記の様に5999/tcp open ncd-confがオープンしています。vncserver-virtualdは、vncviewerが新しいセッションが成立する毎にライセンスカウンタを減じます
また、vncserver-virtualの起動と、終了を自動的に行いますので、下記5.2.4,5.2.5の起動(vncserver-virtual :2)と停止(vncserver-virtual -kill :2)は必要ありません。
# nmap localhost -p 5900-5999
Starting Nmap 7.70 ( https://nmap.org ) at 2022-12-12 09:01 JST
Nmap scan report for localhost (127.0.0.1)
Host is up (0.0000090s latency).
Other addresses for localhost (not scanned): ::1
Not shown: 98 closed ports
PORT     STATE SERVICE
5900/tcp open  vnc
5999/tcp open  ncd-conf

Nmap done: 1 IP address (1 host up) scanned in 1.51 seconds
5.2.4 rootでログインする場合
    # vncserver-virtual :2 &
    # vncviewer :2

    # vncserver-virtual :3 &
    # vncviewer :3
下記RealVNCのログインメニューから、認証させるユーザ(この場合はroot)でログインすると、仮想Xの画面が表示されます![[RealVNC1.png]](IMAGES/RealVNC1.png "RedHawk Linux 8.4 RealVNC1")
![[RealVNC2.png]](IMAGES/RealVNC2.png "RedHawk Linux 8.4 RealVNC2")
5.2.5 別ユーザ(この例ではredhawk84)でログインする場合
注 追加パッケージとして、sshpassを利用しています。また、上記「7.追加処置」を行っておいてください。
	# sshpass -p redhawk84パスワード ssh -XY redhawk84@localhost << EOC
	vncserver-virtual :2
	vncviewer :2
	vncserver-virtual -kill :2
	EOC
または
	# ssh -XY redhawk84@localhost << EOC
	vncserver-virtual :2
	vncviewer :2
	vncserver-virtual -kill :2
	EOC
下記RealVNCのログインメニューから、認証させるユーザ(この場合はredhawk84)でログインすると、仮想Xの画面が表示されます![[RealVNC3.png]](IMAGES/RealVNC3.png "RedHawk Linux 8.4 RealVNC3")
![[RealVNC4.png]](IMAGES/RealVNC4.png "RedHawk Linux 8.4 RealVNC4")
5.2.6 仮想モードのログファイルとエラー
仮想モードの1次ログファイルは、"~/.vnc/localhost.localdomain:ディスプレイ番号.log" に保存されますので、確認してください。
また、仮想モードは"/etc/vnc/xstartup"から"/usr/lib64/xorg/modules/drivers/dummy_drv.so"ドライバを利用してXが起動しています。
この時、Xのコンフィグレーションファイルは、"/etc/X11/vncserver-virtual-dummy.conf"です。
このダミードライバを利用したXサーバのログは、"/var/log/Xorg.ディスプレイ番号.log"に一般ユーザの場合は"~/.local/share/xorg/Xorg.ディスプレイ番号.log"に保存されます。
下記にその例を示しますが、(EE)の部分で、voidドライバが読み込めずに、libinputに"Falling back"していることが解ります。
なおこのエラーは、 xorg-x11-drv-void パケージがインストールされていないこと原因ですが、
RHEL 8系ではxorg-x11-drv-void パケージは配布されていませんので、無視して構いません。
X.Org X Server 1.20.11
X Protocol Version 11, Revision 0
[  3873.949] Build Operating System:  4.18.0-372.19.1.el8_6.x86_64
[  3873.949] Current Operating System: Linux localhost.localdomain 5.10.131-rt72-RedHawk-8.4.3-trace #1 SMP PREEMPT Thu Sep 1 14:09:13 EDT 2022 x86_64
[  3873.949] Kernel command line: BOOT_IMAGE=(hd2,gpt2)/vmlinuz-5.10.131-rt72-RedHawk-8.4.3-trace root=UUID=6a63b9a6-c9e0-482b-8f32-4fa1c9edaaf4 ro crashkernel=auto resume=UUID=809ebfe4-47fd-41ec-9ba3-9ae00c610c4e rhgb quiet
[  3873.949] Build Date: 01 October 2022  07:56:09AM
[  3873.949] Build ID: xorg-x11-server 1.20.11-9.el8
[  3873.949] Current version of pixman: 0.38.4
[  3873.949]    Before reporting problems, check http://wiki.x.org
        to make sure that you have the latest version.
[  3873.949] Markers: (--) probed, (**) from config file, (==) default setting,
        (++) from command line, (!!) notice, (II) informational,
        (WW) warning, (EE) error, (NI) not implemented, (??) unknown.
[  3873.949] (==) Log file: "/home/redhawk84/.local/share/xorg/Xorg.2.log", Time: Fri Dec  9 12:55:35 2022
[  3873.949] (++) Using config file: "/etc/X11/vncserver-virtual-dummy.conf"
[  3873.949] (==) Using config directory: "/etc/X11/xorg.conf.d"
[  3873.949] (==) Using system config directory "/usr/share/X11/xorg.conf.d"
[  3873.949] (==) ServerLayout "dummy_layout"
[  3873.949] (**) |-->Screen "dummy_screen" (0)
[  3873.950] (**) |   |-->Monitor "dummy_monitor"
[  3873.950] (**) |   |-->Device "dummy_videocard"
[  3873.950] (**) |-->Input Device "void_mouse"
[  3873.950] (**) |-->Input Device "void_keyboard"
[  3873.950] (**) Option "DontVTSwitch" "true"
[  3873.950] (**) Option "AllowMouseOpenFail" "true"
[  3873.950] (**) Option "IgnoreABI" "true"
[  3873.950] (**) Option "AutoAddDevices" "false"
[  3873.950] (**) Option "AutoEnableDevices" "false"
[  3873.950] (**) Ignoring ABI Version
[  3873.950] (**) Not automatically adding devices
[  3873.950] (**) Not automatically enabling devices
[  3873.950] (==) Automatically adding GPU devices
[  3873.950] (==) Automatically binding GPU devices
[  3873.950] (==) Max clients allowed: 256, resource mask: 0x1fffff
[  3873.950] (++) FontPath set to:
        catalogue:/etc/X11/fontpath.d,
        built-ins
[  3873.950] (==) ModulePath set to "/usr/lib64/xorg/modules"
[  3873.950] (II) Loader magic: 0x555555848020
[  3873.950] (II) Module ABI versions:
[  3873.950]    X.Org ANSI C Emulation: 0.4
[  3873.950]    X.Org Video Driver: 24.1
[  3873.950]    X.Org XInput driver : 24.1
[  3873.950]    X.Org Server Extension : 10.0
[  3873.952] (II) systemd-logind: took control of session /org/freedesktop/login1/session/_312
[  3873.952] (II) xfree86: Adding drm device (/dev/dri/card0)
[  3873.952] (II) Platform probe for /sys/devices/pci0000:16/0000:16:00.0/0000:17:00.0/drm/card0
[  3873.952] (EE) systemd-logind: failed to take device /dev/dri/card0: Operation not permitted
[  3873.964] (--) PCI:*(23@0:0:0) 10de:1c31:10de:131b rev 161, Mem @ 0xc4000000/16777216, 0xb0000000/268435456, 0xc0000000/33554432, I/O @ 0x00007000/128, BIOS @ 0x????????/65536
[  3873.964] (II) LoadModule: "glx"
[  3873.964] (II) Loading /usr/lib64/xorg/modules/extensions/libglx.so
[  3873.965] (II) Module glx: vendor="X.Org Foundation"
[  3873.965]    compiled for 1.20.11, module version = 1.0.0
[  3873.965]    ABI class: X.Org Server Extension, version 10.0
[  3873.965] (II) LoadModule: "dummy"
[  3873.965] (II) Loading /usr/lib64/xorg/modules/drivers/dummy_drv.so
[  3873.965] (II) Module dummy: vendor="X.Org Foundation"
[  3873.965]    compiled for 1.20.8, module version = 0.3.7
[  3873.965]    Module class: X.Org Video Driver
[  3873.965]    ABI class: X.Org Video Driver, version 24.1
[  3873.965] (II) LoadModule: "void"
[  3873.965] (WW) Warning, couldn't open module void
[  3873.965] (EE) Failed to load module "void" (module does not exist, 0)
[  3873.965] (II) DUMMY: Driver for Dummy chipsets: dummy
[  3873.965] (WW) Falling back to old probe method for dummy
[  3873.965] (WW) VGA arbiter: cannot open kernel arbiter, no multi-card support
[  3873.965] (II) DUMMY(0): Chipset is a DUMMY
[  3873.965] (II) DUMMY(0): Creating default Display subsection in Screen section
        "dummy_screen" for depth/fbbpp 24/32
[  3873.965] (==) DUMMY(0): Depth 24, (--) framebuffer bpp 32
[  3873.965] (==) DUMMY(0): RGB weight 888
[  3873.965] (==) DUMMY(0): Default visual is TrueColor
[  3873.965] (==) DUMMY(0): Using gamma correction (1.0, 1.0, 1.0)
[  3873.965] (DB) xf86MergeOutputClassOptions unsupported bus type 0
[  3873.965] (**) DUMMY(0): VideoRAM: 192000 kByte
[  3873.965] (--) DUMMY(0): Max Clock: 230000 kHz
[  3873.965] (II) DUMMY(0): dummy_monitor: Using hsync range of 1.00-2000.00 kHz
[  3873.965] (II) DUMMY(0): dummy_monitor: Using vrefresh range of 1.00-200.00 Hz
[  3873.965] (WW) DUMMY(0): Unable to estimate virtual size
[  3873.965] (II) DUMMY(0): Clock range:  11.00 to 300.00 MHz
[  3873.965] (II) DUMMY(0): Not using default mode "1920x1440" (bad mode clock/interlace/doublescan)
	:
[  3873.965] (II) DUMMY(0): Not using default mode "2048x1536" (bad mode clock/interlace/doublescan)
	:
[  3873.965] (II) DUMMY(0): Not using default mode "2560x1600" (bad mode clock/interlace/doublescan)
[  3873.966] (II) DUMMY(0): Virtual size is 2048x1536 (pitch 2048)
[  3873.966] (**) DUMMY(0): *Default mode "2048x1536": 266.9 MHz, 95.3 kHz, 60.0 Hz
[  3873.966] (II) DUMMY(0): Modeline "2048x1536"x60.0  266.95  2048 2200 2424 2800  1536 1537 1540 1589 -hsync +vsync (95.3 kHz zd)
	:
[  3873.967] (II) DUMMY(0): Modeline "320x175"x85.3   15.75  320 336 368 416  175 191 192 222 doublescan +hsync -vsync (37.9 kHz zd)
[  3873.967] (==) DUMMY(0): DPI set to (96, 96)
[  3873.967] (II) Loading sub module "fb"
[  3873.967] (II) LoadModule: "fb"
[  3873.967] (II) Loading /usr/lib64/xorg/modules/libfb.so
[  3873.967] (II) Module fb: vendor="X.Org Foundation"
[  3873.967]    compiled for 1.20.11, module version = 1.0.0
[  3873.967]    ABI class: X.Org ANSI C Emulation, version 0.4
[  3873.967] (II) Loading sub module "ramdac"
[  3873.967] (II) LoadModule: "ramdac"
[  3873.967] (II) Module "ramdac" already built-in
[  3873.967] (II) DUMMY(0): Using 22464 scanlines of offscreen memory
[  3873.967] (==) DUMMY(0): Backing store enabled
[  3873.967] (==) DUMMY(0): Silken mouse enabled
[  3873.967] (II) Initializing extension Generic Event Extension
[  3873.967] (II) Initializing extension SHAPE
[  3873.967] (II) Initializing extension MIT-SHM
[  3873.967] (II) Initializing extension XInputExtension
[  3873.968] (II) Initializing extension XTEST
[  3873.968] (II) Initializing extension BIG-REQUESTS
[  3873.968] (II) Initializing extension SYNC
[  3873.968] (II) Initializing extension XKEYBOARD
[  3873.968] (II) Initializing extension XC-MISC
[  3873.968] (II) Initializing extension SECURITY
[  3873.968] (II) Initializing extension XFIXES
[  3873.968] (II) Initializing extension RENDER
[  3873.968] (II) Initializing extension RANDR
[  3873.968] (II) Initializing extension COMPOSITE
[  3873.968] (II) Initializing extension DAMAGE
[  3873.968] (II) Initializing extension MIT-SCREEN-SAVER
[  3873.969] (II) Initializing extension DOUBLE-BUFFER
[  3873.969] (II) Initializing extension RECORD
[  3873.969] (II) Initializing extension DPMS
[  3873.969] (II) Initializing extension Present
[  3873.969] (II) Initializing extension DRI3
[  3873.969] (II) Initializing extension X-Resource
[  3873.969] (II) Initializing extension XVideo
[  3873.969] (II) Initializing extension XVideo-MotionCompensation
[  3873.969] (II) Initializing extension SELinux
	:
[  3873.969] (II) SELinux: Disabled on system
[  3873.969] (II) Initializing extension GLX
[  3873.969] (II) AIGLX: Screen 0 is not DRI2 capable
[  3873.985] (II) IGLX: Loaded and initialized swrast
[  3873.985] (II) GLX: Initialized DRISWRAST GL provider for screen 0
[  3873.985] (II) Initializing extension XFree86-VidModeExtension
[  3873.985] (II) Initializing extension XFree86-DGA
[  3873.985] (II) Initializing extension XFree86-DRI
[  3873.985] (II) Initializing extension DRI2
[  3874.006] (II) LoadModule: "void"
[  3874.006] (WW) Warning, couldn't open module void
[  3874.006] (EE) Failed to load module "void" (module does not exist, 0)
[  3874.006] (EE) No input driver matching `void'
[  3874.006] (II) Falling back to input driver `libinput'
[  3874.006] (II) LoadModule: "libinput"
[  3874.006] (II) Loading /usr/lib64/xorg/modules/input/libinput_drv.so
[  3874.011] (II) Module libinput: vendor="X.Org Foundation"
[  3874.011]    compiled for 1.20.8, module version = 0.29.0
[  3874.011]    Module class: X.Org XInput Driver
[  3874.011]    ABI class: X.Org XInput driver, version 24.1
[  3874.011] (II) Using input driver 'libinput' for 'void_mouse'
[  3874.011] (**) Option "CorePointer" "true"
[  3874.011] (**) void_mouse: always reports core events
[  3874.011] (EE) PreInit returned 2 for "void_mouse"
[  3874.011] (II) UnloadModule: "libinput"
[  3874.011] (II) LoadModule: "void"
[  3874.011] (WW) Warning, couldn't open module void
[  3874.011] (EE) Failed to load module "void" (module does not exist, 0)
[  3874.011] (EE) No input driver matching `void'
[  3874.011] (II) Falling back to input driver `libinput'
[  3874.011] (II) Using input driver 'libinput' for 'void_keyboard'
[  3874.011] (**) Option "CoreKeyboard" "true"
[  3874.011] (**) void_keyboard: always reports core events
[  3874.011] (EE) PreInit returned 2 for "void_keyboard"
[  3874.011] (II) UnloadModule: "libinput"
[  3874.020] (II) config/udev: Adding input device Power Button (/dev/input/event1)
[  3874.020] (II) AutoAddDevices is off - not adding device.
[  3874.020] (II) config/udev: Adding input device Power Button (/dev/input/event0)
[  3874.020] (II) AutoAddDevices is off - not adding device.
[  3874.020] (II) config/udev: Adding input device Dell KB216 Wired Keyboard (/dev/input/event2)
[  3874.020] (II) AutoAddDevices is off - not adding device.
[  3874.021] (II) config/udev: Adding input device Dell KB216 Wired Keyboard System Control (/dev/input/event3)
[  3874.021] (II) AutoAddDevices is off - not adding device.
[  3874.021] (II) config/udev: Adding input device Dell KB216 Wired Keyboard Consumer Control (/dev/input/event4)
[  3874.021] (II) AutoAddDevices is off - not adding device.
[  3874.022] (II) config/udev: Adding input device PixArt USB Optical Mouse (/dev/input/event5)
[  3874.022] (II) AutoAddDevices is off - not adding device.
[  3874.022] (II) config/udev: Adding input device PixArt USB Optical Mouse (/dev/input/mouse0)
[  3874.022] (II) AutoAddDevices is off - not adding device.
[  3874.022] (II) config/udev: Adding input device HDA Intel PCH Rear Mic (/dev/input/event15)
[  3874.022] (II) AutoAddDevices is off - not adding device.
[  3874.022] (II) config/udev: Adding input device HDA Intel PCH Front Mic (/dev/input/event16)
[  3874.022] (II) AutoAddDevices is off - not adding device.
[  3874.023] (II) config/udev: Adding input device HDA Intel PCH Line Out (/dev/input/event17)
[  3874.023] (II) AutoAddDevices is off - not adding device.
[  3874.023] (II) config/udev: Adding input device HDA Intel PCH Front Headphone (/dev/input/event18)
[  3874.023] (II) AutoAddDevices is off - not adding device.
[  3874.023] (II) config/udev: Adding drm device (/dev/dri/card0)
[  3874.023] (II) xfree86: Adding drm device (/dev/dri/card0)
[  3874.023] (II) Platform probe for /sys/devices/pci0000:16/0000:16:00.0/0000:17:00.0/drm/card0
[  3874.023] (EE) systemd-logind: failed to take device /dev/dri/card0: Operation not permitted
[  3874.023] (II) config/udev: Adding input device HDA NVidia HDMI/DP,pcm=8 (/dev/input/event10)
[  3874.023] (II) AutoAddDevices is off - not adding device.
[  3874.024] (II) config/udev: Adding input device HDA NVidia HDMI/DP,pcm=9 (/dev/input/event11)
[  3874.024] (II) AutoAddDevices is off - not adding device.
[  3874.024] (II) config/udev: Adding input device HDA NVidia HDMI/DP,pcm=10 (/dev/input/event12)
[  3874.024] (II) AutoAddDevices is off - not adding device.
[  3874.024] (II) config/udev: Adding input device HDA NVidia HDMI/DP,pcm=11 (/dev/input/event13)
[  3874.024] (II) AutoAddDevices is off - not adding device.
[  3874.024] (II) config/udev: Adding input device HDA NVidia HDMI/DP,pcm=12 (/dev/input/event14)
[  3874.024] (II) AutoAddDevices is off - not adding device.
[  3874.025] (II) config/udev: Adding input device HDA NVidia HDMI/DP,pcm=3 (/dev/input/event8)
[  3874.025] (II) AutoAddDevices is off - not adding device.
[  3874.025] (II) config/udev: Adding input device HDA NVidia HDMI/DP,pcm=7 (/dev/input/event9)
[  3874.025] (II) AutoAddDevices is off - not adding device.
[  3874.025] (II) config/udev: Adding input device Dell WMI hotkeys (/dev/input/event7)
[  3874.025] (II) AutoAddDevices is off - not adding device.
[  3874.025] (II) config/udev: Adding input device PC Speaker (/dev/input/event6)
[  3874.025] (II) AutoAddDevices is off - not adding device.
[  3903.966] (II) Server terminated successfully (0). Closing log file.
6 kde_plasmaで仮想VNCサーバでログインする場合の修正
RealVNCの仮想VNCサーバは、現在loginしているデスクトップ(gnomeあるいはgnome-classic)でログインしますが、EPELからインストールしたkde_plasmaなどは、正しく表示できません。
起動は/etc/vnc/xstartupから行われるので、これを修正します。
55行目のSESSIONBIN="$SESSIONBIN gnome"を修正してください。
     45 unset SESSIONBIN
     46 XTERM_COMMAND="xterm -geometry 80x24+10+10 -ls"
     47
     48 if   [ -x /etc/X11/Xsession ]; then SESSIONBIN="/etc/X11/Xsession"
     49 elif [ -x /etc/X11/xdm/Xsession ]; then SESSIONBIN="/etc/X11/xdm/Xsession"
     50 elif [ -x /etc/X11/xinit/Xsession ]; then
     51   SESSIONBIN="/etc/X11/xinit/Xsession"
     52   # Use gnome as a sensible default in SystemXorg mode on RedHat based systems
     53   if [ ! -x "$HOME/.xsession" -a ! -x "$HOME/.Xclients" -a \
     54       "$VNC_SYSTEMXORG" -a -e /etc/redhat-release -a -x /usr/bin/gnome-session ]; then
     55     SESSIONBIN="$SESSIONBIN gnome"
     56   fi
     57 elif [ -x /etc/X11/gdm/Xsession ]; then SESSIONBIN="/etc/X11/gdm/Xsession gnome-session"
     58 elif [ -x /etc/gdm/Xsession ]; then SESSIONBIN="/etc/gdm/Xsession gnome-session"
     59 elif [ -x /etc/kde/kdm/Xsession ]; then SESSIONBIN="/etc/kde/kdm/Xsession"
     60 elif [ -x /usr/dt/bin/Xsession ]; then
     61   XSTATION=1
     62   DTXSERVERLOCATION=local
     63   export XSTATION DTXSERVERLOCATION
     64   SESSIONBIN="/usr/dt/bin/Xsession"
     65 elif [ -x /usr/dt/bin/dtsession ]; then SESSIONBIN="/usr/dt/bin/dtsession"
     66 elif which twm > /dev/null 2>&1; then
     67   $XTERM_COMMAND &
     68   SESSIONBIN="twm"
     69 fi
修正箇所を以下に示します。
      53   if [ ! -x "$HOME/.xsession" -a ! -x "$HOME/.Xclients" -a \
      54         "$VNC_SYSTEMXORG" -a -e /etc/redhat-release -a -x /usr/bin/gnome-session ]; then
                USERSESSION=`fgrep Session /var/lib/AccountsService/users/$USER|cut -d= -f2`
                if [ "$USERSESSION" = "plasma" ]
                then
                        SESSIONBIN="plasma_session"
                else
      55                SESSIONBIN="$SESSIONBIN gnome"
                fi
      56  fi
なお、下記のコマンドを実行すると、/etc/vnc/xstartupは初期状態に戻りますのでご注意ください。
# vncinitconfig -install-defaults
また、コンピュータのすべてのユーザーに対して変更を加えるには、/etc/vnc/xstartup.customを作成します。このファイルが存在する場合、デフォルトの/etc/vnc/xstartupスクリプトは実行されません。
注:/etc/vnc/xstartupの22行目には、setxkbmapを利用して、キーボード設定を変更する方法が記述されています。
もし、独自に日本語キーボード等に変更する場合、以下のコマンドの様にmodelとlayoutを読み出して以下の様に実行してください。
setxkbmap -model pc106 -layout jp,us
	# setxkbmap -query
	rules:      evdev
	model:      pc106
	layout:     jp,us
	variant:    ,

	# localectl status
	   System Locale: LANG=ja_JP.UTF-8
	       VC Keymap: jp
	      X11 Layout: jp
7.ユーザ個別のサーバー設定ファイル特定のユーザーの変更を行うには、~/.vnc/xstartupを作成します。
このファイルが存在する場合、そのユーザーに対してシステム全体のスクリプトは実行されません。
注1.かな漢字変換を必要とする場合は、~/.config/fcitxディレクトリも作成してください。
# mkdir ~/.config/fcitx
注2.~/.vnc/xstartupには、実行権限が必要です。
# chmod 755 ~/.vnc/xstartup
7.1 ユーザ個別のサーバー設定ファイル例下記に、「Motif ウィンドウマネージャ」を利用する例を示します。(別途、dnf install motif を実行しておいて下さい)
(1) 下記の内容で、~/.vnc/xstartup ファイルを作成します。
	#!/bin/bash
	xsetroot -solid gray20
	####################################################
	# 以下の記述はかな漢字変換を利用する場合に必要です
	####################################################
	export LANG=ja_JP.UTF-8
	export GDM_LANG=ja_JP.UTF-8
	####################################################
	# RealVNCでは、以下の環境変数を追加してください
	####################################################
	export GDM_LANG=ja_JP.UTF-8
	export GTK_IM_MODULE=ibus
	export XMODIFIERS=@im=ibus
	export QT_IM_MODULE=ibus
	####################################################
	# 仮想モードでは、['<Super>+space']による、かな漢字変換エンジンへの切り替えが、
	# ホスト側のウィンドウマネージャによって、アクセプトされ、仮想モード側に認識されないため、
	# 別のキーバイディングに変更します。
	####################################################
	gsettings set org.freedesktop.ibus.general.hotkey trigger "['<Ctrl>+space', 'Zenkaku_Hankaku', 'Alt+Kanji', 'Alt+grave', 'Hangul', 'Alt+Release+Alt_R']"
	gsettings set org.freedesktop.ibus.general.hotkey triggers "['<Ctrl>space']"
	####################################################
	# かな漢字変換エンジンを起動します
	####################################################
	/usr/bin/ibus-daemon -r --xim -d
	/usr/libexec/ibus-engine-kkc --ibus &
	/usr/libexec/ibus-engine-simple &
	####################################################
	# Motif ウィンドウマネージャを起動します
	####################################################
	exec /usr/bin/mwm
(2) ~/.vnc/xstartup ファイルに実行権を付与します。
# chmod 755 ~/.vnc/xstartup
(3) Motif起動画面下記の様に、仮想vncサーバ上でMotif/xterm/かな漢字変換も動作します。
![[RealVNCmwm.png]](IMAGES/RealVNCmwm.png "RedHawk Linux 8.4 RealVNC & mwm")
VirtualGL は、仮想画面で動作するOpenGLアプリケーションからNvidia等の3Dアクセラレータハードウェアへ3Dレンダリングコマンドをリダイレクトし、
ネットワーク上のVNC等のシンクライアントにその描画出力をインタラクティブに表示するプログラムです。
注意:
VirtualGL を使用する場合、プロセス間で GLXPIXMAP を使用することはできません。
VirtualGL 経由で CUDA 描画データを表示できないアプリケーション プログラムが多数あります。
1. インストール
# cd /etc/yum.repos.d/
# wget https://virtualgl.org/pmwiki/uploads/Downloads/VirtualGL.repo
# dnf install VirtualGL
VirtualGL official RPMs                          10 kB/s |  54 kB     00:05
メタデータの期限切れの最終確認: 0:00:01 時間前の 2022年12月21日 15時45分59秒 に実施しました。
依存関係が解決しました。
================================================================================
 パッケージ       Arch          バージョン               リポジトリー     サイズ
================================================================================
インストール:
 VirtualGL        x86_64        3.0.90-20221122          VirtualGL        2.8 M

トランザクションの概要
================================================================================
インストール  1 パッケージ

ダウンロードサイズの合計: 2.8 M
インストール後のサイズ: 10 M
これでよろしいですか? [y/N]: y
パッケージのダウンロード:
VirtualGL-3.0.90.x86_64.rpm                     1.7 MB/s | 2.8 MB     00:01
--------------------------------------------------------------------------------
合計                                            1.7 MB/s | 2.8 MB     00:01
VirtualGL official RPMs                         1.3 kB/s | 1.8 kB     00:01
GPG 鍵 0x6E7FE9A1 をインポート中:
 Userid     : "The VirtualGL Project (Signing key for official binaries) "
 Fingerprint: AE1A 7BA4 EFFF 9A99 87E1 474C 4BAC CAB3 6E7F E9A1
 From       : https://sourceforge.net/projects/virtualgl/files/VGL-GPG-KEY
これでよろしいですか? [y/N]: y
鍵のインポートに成功しました
VirtualGL official RPMs                         1.5 kB/s | 1.7 kB     00:01
GPG 鍵 0x72FEB9CE をインポート中:
 Userid     : "The VirtualGL Project (Signing key for official binaries) "
 Fingerprint: ECF0 1671 D05E 2A10 5FF8 4DC4 6BBE FA19 72FE B9CE
 From       : https://sourceforge.net/projects/virtualgl/files/VGL-GPG-KEY-1024
これでよろしいですか? [y/N]: y
鍵のインポートに成功しました
トランザクションの確認を実行中
トランザクションの確認に成功しました。
トランザクションのテストを実行中
トランザクションのテストに成功しました。
トランザクションを実行中
  準備             :                                                        1/1
  インストール中   : VirtualGL-3.0.90-20221122.x86_64                       1/1
  scriptletの実行中: VirtualGL-3.0.90-20221122.x86_64                       1/1
  検証             : VirtualGL-3.0.90-20221122.x86_64                       1/1
インストール済みの製品が更新されています。

インストール済み:
  VirtualGL-3.0.90-20221122.x86_64

完了しました!
2. 試験環境
        5.10.131-rt72-RedHawk-8.4.3
        VirtualGL-3.0.90-20221122.x86_64

	tigervnc-server-module-1.12.0-7.el8.x86_64
        tigervnc-license-1.12.0-7.el8.noarch
        tigervnc-server-minimal-1.12.0-7.el8.x86_64
        tigervnc-1.12.0-7.el8.x86_64
        tigervnc-icons-1.12.0-7.el8.noarch
        tigervnc-selinux-1.12.0-7.el8.noarch
        tigervnc-server-1.12.0-7.el8.x86_64

        libvncserver-0.9.11-17.el8.x86_64
        gvnc-0.9.0-2.el8.x86_64
        gtk-vnc2-0.9.0-2.el8.x86_64
        x11vnc-0.9.16-3.el8.x86_64
3. 試験方法
下記の様に、rootユーザーでサーバをマニュアル起動し、ウィンドウマネージャをmwmに変更して、~/.vnc/xstartupから起動する
        # vncserver :2
        WARNING: vncserver has been replaced by a systemd unit and is now considered deprecated and removed in upstream.
        Please read /usr/share/doc/tigervnc/HOWTO.md for more information.

        New 'localhost.localdomain:2 (root)' desktop is localhost.localdomain:2

        Starting applications specified in /root/.vnc/xstartup
        Log file is /root/.vnc/localhost.localdomain:2.log

        # vncviewer -passwd ~/.vnc/passwd --shared localhost:2
        TigerVNC Viewer 64-bit v1.12.0
        Built on: 2022-10-02 04:50
        Copyright (C) 1999-2021 TigerVNC Team and many others (see README.rst)
        See https://www.tigervnc.org for information on TigerVNC.

        Thu Dec 22 10:02:15 2022
         DecodeManager: Detected 4 CPU core(s)
         DecodeManager: Creating 4 decoder thread(s)
         CConn:       Connected to host localhost port 5902
         CConnection: Server supports RFB protocol version 3.8
         CConnection: Using RFB protocol version 3.8
         CConnection: Choosing security type VeNCrypt(19)
         CVeNCrypt:   Choosing security type TLSVnc (258)
         CConn:       Using pixel format depth 24 (32bpp) little-endian rgb888
         CConnection: Enabling continuous updates

        Thu Dec 22 10:02:25 2022
         CConn:       End of stream
4. VirtualGL使用時の~/.vnc/xstartupファイル注意:vglrunのディスプレイオプションを使って、Nvidiaのレンダリングを行っているディスプレイ番号を指定
        #!/bin/sh
        unset SESSION_MANAGER
        unset DBUS_SESSION_BUS_ADDRESS
        export __GL_SYNC_TO_VBLANK=0
        export __GLX_VENDOR_LIBRARY_NAME=nvidia
        export VGL_DISPLAY=:1
        vglrun -d :1 /usr/bin/mwm
        vncserver -kill $DISPLAY
注意:__GLX_VENDOR_LIBRARY_NAMEの詳細は、GL Vendor-Neutral Dispatch libraryについてを参照してください。5. VirtualGL使用しない時の~/.vnc/xstartupファイル
        #!/bin/sh
        unset SESSION_MANAGER
        unset DBUS_SESSION_BUS_ADDRESS
        /usr/bin/mwm
        vncserver -kill $DISPLAY
6. 結果6.1 VirtualGLを使用した時の結果
     単純起動
                # glxgears
                9810 frames in 5.0 seconds = 1961.868 FPS
                9751 frames in 5.0 seconds = 1950.197 FPS
                10717 frames in 5.0 seconds = 2143.374 FPS
                10709 frames in 5.0 seconds = 2141.744 FPS
                10731 frames in 5.0 seconds = 2146.112 FPS

     GLXライブラリをmesaに強制(VirtualGLがハードウェアレンダリング機構を利用できないのでエラーになる)
                # __GLX_VENDOR_LIBRARY_NAME=mesa glxgears
                X Error of failed request:  BadDrawable (invalid Pixmap or Window parameter)
                  Major opcode of failed request:  55 (X_CreateGC)
                  Resource id in failed request:  0x3000002
                  Serial number of failed request:  33
                  Current serial number in output stream:  34

     glxinfoの状態
                # glxinfo|grep OpenGL
                OpenGL vendor string: NVIDIA Corporation
                OpenGL renderer string: Quadro P2200/PCIe/SSE2
                OpenGL core profile version string: 4.6.0 NVIDIA 470.74
                OpenGL core profile shading language version string: 4.60 NVIDIA
                OpenGL core profile context flags: (none)
                OpenGL core profile profile mask: core profile
                OpenGL core profile extensions:
                OpenGL version string: 4.6.0 NVIDIA 470.74
                OpenGL shading language version string: 4.60 NVIDIA
                OpenGL context flags: (none)
                OpenGL profile mask: (none)
                OpenGL extensions:
                OpenGL ES profile version string: OpenGL ES 3.2 NVIDIA 470.74
                OpenGL ES profile shading language version string: OpenGL ES GLSL ES 3.20
                OpenGL ES profile extensions:
6.2 VirtualGLを使用しない時の結果
     単純起動
                # glxgears
                9759 frames in 5.0 seconds = 1951.702 FPS
                13755 frames in 5.0 seconds = 2750.885 FPS
                13821 frames in 5.0 seconds = 2764.134 FPS
                13814 frames in 5.0 seconds = 2762.791 FPS
                13795 frames in 5.0 seconds = 2758.895 FPS

     GLXライブラリをmesaに強制(VirtualGLを利用しないのでハードウェアレンダリング機構が無くてもエラーにならない)
                # __GLX_VENDOR_LIBRARY_NAME=mesa glxgears
                11503 frames in 5.0 seconds = 2300.462 FPS
                9834 frames in 5.0 seconds = 1966.764 FPS
                10780 frames in 5.0 seconds = 2155.847 FPS
                10769 frames in 5.0 seconds = 2153.701 FPS
                10765 frames in 5.0 seconds = 2152.965 FPS

     glxinfoの状態(__GLX_VENDOR_LIBRARY_NAME=nvidiaで、Nvidiaが利用される)
                # glxinfo|grep OpenGL
                OpenGL vendor string: NVIDIA Corporation
                OpenGL renderer string: Quadro P2200/PCIe/SSE2
                OpenGL core profile version string: 4.6.0 NVIDIA 470.74
                OpenGL core profile shading language version string: 4.60 NVIDIA
                OpenGL core profile context flags: (none)
                OpenGL core profile profile mask: core profile
                OpenGL core profile extensions:
                OpenGL version string: 4.6.0 NVIDIA 470.74
                OpenGL shading language version string: 4.60 NVIDIA
                OpenGL context flags: (none)
                OpenGL profile mask: (none)
                OpenGL extensions:
                OpenGL ES profile version string: OpenGL ES 3.2 NVIDIA 470.74
                OpenGL ES profile shading language version string: OpenGL ES GLSL ES 3.20
                OpenGL ES profile extensions:
VirtualGL は、仮想画面で動作するOpenGLアプリケーションからNvidia等の3Dアクセラレータハードウェアへ3Dレンダリングコマンドをリダイレクトし、
ネットワーク上のVNC等のシンクライアントにその描画出力をインタラクティブに表示するプログラムです。
注意:
VirtualGL を使用する場合、プロセス間で GLXPIXMAP を使用することはできません。
VirtualGL 経由で CUDA 描画データを表示できないアプリケーション プログラムが多数あります。
1. インストール 上記、TigerVNCとVirtualGLの併用設定と同じ
2. 試験環境
        5.10.131-rt72-RedHawk-8.4.3
        VirtualGL-3.0.90-20221122.x86_64
        realvnc-vnc-server-6.11.0.47988-1.x86_64
        realvnc-vnc-viewer-6.22.826.47988-1.x86_64

        libvncserver-0.9.11-17.el8.x86_64
        gvnc-0.9.0-2.el8.x86_64
        gtk-vnc2-0.9.0-2.el8.x86_64
        x11vnc-0.9.16-3.el8.x86_64
3. 試験方法
下記の様に、rootユーザーでサーバをマニュアル起動し、ウィンドウマネージャをmwmに変更して、~/.vnc/xstartupから起動する
        # vncserver-virtual :2
	VNC(R) Server 6.11.0 (r47988) x64 (Sep 15 2022 17:28:37)
	Copyright (C) RealVNC Ltd.
	RealVNC and VNC are trademarks of RealVNC Ltd and are protected by trademark
	registrations and/or pending trademark applications in the European Union,
	United States of America and other jurisdictions.
	Protected by UK patent 2481870; US patent 8760366; EU patent 2652951.
	See https://www.realvnc.com for information on VNC.
	For third party acknowledgements see:
	https://www.realvnc.com/docs/6/foss.html
	OS: RedHawk Linux 8.4, Linux 5.10.131, amd64

	Xorg driver not found: Xorg void input driver
	You've set vncserver-virtual to use the system Xorg server. For more information
	on this alternative implementation, please see:
	https://www.realvnc.com/doclink/kb-546

	Running applications in /root/.vnc/xstartup

	VNC Server catchphrase: "Tic-tac flower monster. Poetic Laura eternal."
             	signature: 2a-a3-5a-4b-da-f2-71-8b

	Log file is /root/.vnc/localhost.localdomain:2.log
	New desktop is localhost.localdomain:2 (192.168.122.1:2)

        # vncviewer :2
4. VirtualGLを使用時の~/.vnc/xstartupファイル
注:vglrunのディスプレイオプションを使って、Nvidiaのレンダリングを行っているディスプレイ番号を指定
	#!/bin/bash
	xsetroot -solid gray20
	####################################################
	# 以下の記述はかな漢字変換を利用する場合に必要です
	####################################################
	export LANG=ja_JP.UTF-8
	export GDM_LANG=ja_JP.UTF-8
	export GDM_LANG=ja_JP.UTF-8
	export GTK_IM_MODULE=ibus
	export XMODIFIERS=@im=ibus
	export QT_IM_MODULE=ibus
	####################################################
	# 仮想モードでは、['+space']による、かな漢字変換エンジンへの切り替えが、
	# ホスト側のウィンドウマネージャによって、アクセプトされ、仮想モード側に認識されないため、
	# 別のキーバイディングに変更します。
	####################################################
	gsettings set org.freedesktop.ibus.general.hotkey trigger "['+space', 'Zenkaku_Hankaku', 'Alt+Kanji', 'Alt+grave', 'Hangul', 'Alt+Release+Alt_R']"
	gsettings set org.freedesktop.ibus.general.hotkey triggers "['space']"
	####################################################
	# かな漢字変換エンジンを起動します
	####################################################
	/usr/bin/ibus-daemon -r --xim -d
	/usr/libexec/ibus-engine-kkc --ibus &
	/usr/libexec/ibus-engine-simple &
	####################################################
	# OpenGLの設定
	####################################################
	export __GL_SYNC_TO_VBLANK=0
	export __GLX_VENDOR_LIBRARY_NAME=nvidia
	####################################################
	# VirtualGLの設定
	####################################################
	export VGL_DISPLAY=:1
	####################################################
	# Motif ウィンドウマネージャをvglrunで起動します
	####################################################
	exec vglrun -d :1  /usr/bin/mwm
	####################################################
	# 終了します
	####################################################
	vncserver-virtual -kill $DISPLAY
注意:__GLX_VENDOR_LIBRARY_NAMEの詳細は、GL Vendor-Neutral Dispatch libraryについてを参照してください。5. VirtualGLを使用しない時の~/.vnc/xstartupファイル
	#!/bin/bash
	xsetroot -solid gray20
	####################################################
	# 以下の記述はかな漢字変換を利用する場合に必要です
	####################################################
	export LANG=ja_JP.UTF-8
	export GDM_LANG=ja_JP.UTF-8
	export GDM_LANG=ja_JP.UTF-8
	export GTK_IM_MODULE=ibus
	export XMODIFIERS=@im=ibus
	export QT_IM_MODULE=ibus
	####################################################
	# 仮想モードでは、['+space']による、かな漢字変換エンジンへの切り替えが、
	# ホスト側のウィンドウマネージャによって、アクセプトされ、仮想モード側に認識されないため、
	# 別のキーバイディングに変更します。
	####################################################
	gsettings set org.freedesktop.ibus.general.hotkey trigger "['+space', 'Zenkaku_Hankaku', 'Alt+Kanji', 'Alt+grave', 'Hangul', 'Alt+Release+Alt_R']"
	gsettings set org.freedesktop.ibus.general.hotkey triggers "['space']"
	####################################################
	# かな漢字変換エンジンを起動します
	####################################################
	/usr/bin/ibus-daemon -r --xim -d
	/usr/libexec/ibus-engine-kkc --ibus &
	/usr/libexec/ibus-engine-simple &
	####################################################
	# OpenGLの設定
	####################################################
	export __GL_SYNC_TO_VBLANK=0
	export __GLX_VENDOR_LIBRARY_NAME=nvidia
	####################################################
	# Motif ウィンドウマネージャを起動します
	####################################################
	exec /usr/bin/mwm
	####################################################
	# 終了します
	####################################################
	vncserver-virtual -kill $DISPLAY
6. 結果6.1 VirtualGLを使用した時の結果
     単純起動
                # glxgears
		10231 frames in 5.0 seconds = 2046.097 FPS
		11169 frames in 5.0 seconds = 2233.693 FPS
		11161 frames in 5.0 seconds = 2232.062 FPS

     GLXライブラリをmesaに強制(VirtualGLがハードウェアレンダリング機構を利用できないのでエラーになる)
		# env |grep nvidia
		__GLX_VENDOR_LIBRARY_NAME=nvidia

		# __GLX_VENDOR_LIBRARY_NAME=mesa  glxgears
		X Error of failed request:  BadDrawable (invalid Pixmap or Window parameter)
  		Major opcode of failed request:  55 (X_CreateGC)
  		Resource id in failed request:  0x2e00002
  		Serial number of failed request:  33
  		Current serial number in output stream:  34

     glxinfoの状態(__GLX_VENDOR_LIBRARY_NAME=nvidiaで、Nvidiaが利用される)
                # glxinfo|grep OpenGL
		OpenGL vendor string: NVIDIA Corporation
		OpenGL renderer string: Quadro P2200/PCIe/SSE2
		OpenGL core profile version string: 4.6.0 NVIDIA 470.74
		OpenGL core profile shading language version string: 4.60 NVIDIA
		OpenGL core profile context flags: (none)
		OpenGL core profile profile mask: core profile
		OpenGL core profile extensions:
		OpenGL version string: 4.6.0 NVIDIA 470.74
		OpenGL shading language version string: 4.60 NVIDIA
		OpenGL context flags: (none)
		OpenGL profile mask: (none)
		OpenGL extensions:
		OpenGL ES profile version string: OpenGL ES 3.2 NVIDIA 470.74
		OpenGL ES profile shading language version string: OpenGL ES GLSL ES 3.20
		OpenGL ES profile extensions:
6.2 VirtualGLを使用しない時の結果
     単純起動
                # glxgears
		13447 frames in 5.0 seconds = 2689.300 FPS
		14692 frames in 5.0 seconds = 2938.221 FPS
		14676 frames in 5.0 seconds = 2935.056 FPS
		14647 frames in 5.0 seconds = 2929.219 FPS

     GLXライブラリをmesaに強制(VirtualGLを利用しないのでハードウェアレンダリング機構が無くてもエラーにならない)
                # __GLX_VENDOR_LIBRARY_NAME=mesa glxgears
		12234 frames in 5.0 seconds = 2446.663 FPS
		12083 frames in 5.0 seconds = 2416.590 FPS
		12071 frames in 5.0 seconds = 2414.109 FPS
		11999 frames in 5.0 seconds = 2399.755 FPS

     glxinfoの状態(__GLX_VENDOR_LIBRARY_NAME=nvidiaで、Nvidiaが利用される)
		# glxinfo|grep OpenGL
		OpenGL vendor string: NVIDIA Corporation
		OpenGL renderer string: Quadro P2200/PCIe/SSE2
		OpenGL core profile version string: 4.6.0 NVIDIA 470.74
		OpenGL core profile shading language version string: 4.60 NVIDIA
		OpenGL core profile context flags: (none)
		OpenGL core profile profile mask: core profile
		OpenGL core profile extensions:
		OpenGL version string: 4.6.0 NVIDIA 470.74
		OpenGL shading language version string: 4.60 NVIDIA
		OpenGL context flags: (none)
		OpenGL profile mask: (none)
		OpenGL extensions:
		OpenGL ES profile version string: OpenGL ES 3.2 NVIDIA 470.74
		OpenGL ES profile shading language version string: OpenGL ES GLSL ES 3.20
		OpenGL ES profile extensions:
HeadLess VNCは、HeadLess構成で動作するNvidia Xサーバ からネットワーク上のVNC等のシンクライアントにその描画出力をインタラクティブに表示する構成です。
Nvidia等の3Dアクセラレータハードウェアを利用しますので、CUDAの3Dレンダリングも通常動作します。
ただし、Nvidiaグラフィックカード上のメモリを消費しますので、最大で4画面程度しかHeadLessで利用できません。
Nvidia社のREADME
「UseDisplayDevice」オプションに特別な値「none」を指定すると、ディスプレイ ハードウェアのプログラミングはすべて無効になります。
NVIDIA ドライバーは、この X スクリーンのモード検証またはモード設定を実行しません。
これは、CUDA と組み合わせて使用するか、VNC などのリモート グラフィックス ソリューションで使用することを目的としています。
ただし、この構成オプションは、一部のデスクトップ環境やウィンドウ マネージャーとうまくやり取りできない場合があることに注意してください。
具体的には、gnomeやgnome-classicは動作せず、gnome-flashback(metacity)やkde plasma等の、非標準のディスプレイマネージャのみが動作しました。
また、ベアメタルのウィンドウマネージャとVNC側のウィンドウマネージャは同一であることが望ましいようです。
弊社では以下の表の結果を得ましたので、参考にしてください。
| Window Manager | gnome | gnome-classic | gnome-flashback | MATE | kde plasma | Open Motif | IceWM |
|---|---|---|---|---|---|---|---|
| Repository | Default | Default | Fedora Copr |
EPEL | EPEL | Rocky(RHEL) Option | EPEL |
| Bare metal | OK | OK | OK | OK | OK | タイトルの漢字コードが化ける | OK |
| VNC | 黒画面 | 黒画面 | OK | OK | OK | タイトルの漢字コードが化ける OpenGLの表示が更新されない |
OK |
参考: gnome-flashback.install.log
1. /etc/X11/headless.conf の作成方法
以下のシェルを作成し、実行すると/etc/X11/headless.confが生成されます。
# WindowSize=1024x768
# BUSID=`nvidia-xconfig --query-gpu-info|grep BusID|awk '{print $4}'`
# nvidia-xconfig -a --allow-empty-initial-configuration --use-display-device=None --virtual=$WindowSize --busid $BUSID -o /etc/X11/headless.conf
/etc/X11/headless.confにInputClassを追加します。
# cat >> /etc/X11/headless.conf << EOL
#
# The following definitions are mandatory for Headless VNC connections
# do not delete
#
Section "InputClass"
        Identifier "Ignore libinput"
        Driver "libinput"
        Option "Ignore" "True"
EndSection

Section "InputClass"
        Identifier "Enable evdev"
        Driver "evdev"
        Option "Ignore" "False"
EndSection

Section "ServerFlags"
        Option "AutoEnableDevices" "false"
        Option "AutoAddDevices" "false"
EndSection
#
EOL
下記赤字部分のオプションを追記してください。(x11vncのインストールが省略可能になります。)
Section "Module"
        Load  "glx"
        Load  "glxserver_nvidia"
        Load  "vnc"
EndSection

Section "Screen"
    Identifier     "Screen0"
    Device         "Device0"
    Monitor        "Monitor0"
    DefaultDepth    24
    Option         "AllowEmptyInitialConfiguration" "True"
    Option         "UseDisplayDevice" "None"
    SubSection     "Display"
        Virtual     1024 768
        Depth       24
    EndSubSection
    Option "UserPasswdVerifier" "VncAuth"
    Option "PasswordFile" "/root/.vnc/passwd"
EndSection

Section "ServerFlags"
        Option "AutoEnableDevices" "false"
        Option "AutoAddDevices" "false"
EndSection
2. x11vncをインストールして利用する場合注意:x11vncの利用は、標準保守サポート外です。
注意1:
x11vnc![]() は、EPELプロジェクトからダウンロード/インストールしてください。
は、EPELプロジェクトからダウンロード/インストールしてください。
注意2: x11vncインストール時に、xorg-x11-server-common,tk,xorg-x11-server-Xfb等のパッケージをインストールを必要とする場合があります。
参考: x11vnc.install.log
2.1. /etc/X11/headless.conf でXorgを起動
注意:1 ベアメタル側のデスクトップと共存させるために、-sharevtsが必要です。
# Xorg -ardelay 300 -arinterval 25 :2 -sharevts -auth $XAUTHORITY -config /etc/X11/headless.conf
2.2. x11vncを起動
# x11vnc -repeat -noxdamage -noscr -clip 1024x768+0+0 -geometry 1024x768 -forever -shared -noncache -auth $XAUTHORITY -N -display :2
# vncviewer -RemoteResize=0 -geometry 1024x768+0+0 --shared localhost:2
4. Window Managerを起動
4.1 Open Motif
# DISPLAY=:2 dbus-run-session -- /usr/bin/mwm -multiscreen
4.2 kde plasma
# DISPLAY=:2 dbus-run-session -- /usr/bin/startplasma-x11
4.3 gnome-flashback(metacity)注意:
gome-flashbackは、タッチスクリーンを備えたコンピュータでは使用できません。ログインしようとするとクラッシュします。
かな漢字変換へのiibusエンジン切り替えは、VNC Viewer側のメニュータブからのみ使用出来ます。
Super+Space入力によるibusエンジンの切り替えは、ベアメタル側のGnomeがアクセプトするため、VNCViewer側では利用できません。
下記、HeadLessシェルスクリプトをsystemd --userから起動した場合、VNC Viewer上のメニュータブからLogOutするとベアメタル側も同時にログアウトしますが、
gnome-terminalなどから起動した場合には、シェルスクリプトを終了するだけです。
# export XDG_CURRENT_DESKTOP="GNOME-Flashback:GNOME"
# DISPLAY=:2 dbus-run-session gnome-session --session=gnome-flashback-metacity
# DISPLAY=:2 dbus-run-session -- /usr/bin/icewm-session
注意1:icewmの利用は、標準保守サポート外です。注意2:ibus-kkcを利用後、キーボードレイアウトが英語になる場合、下記の処置を行ってください。
/usr/share/ibus/component/下のkkc.xmlおよびsimple.xmlの<layout>をjpに変更する。
 /usr/share/ibus/component/kkc.xml(deault -> jp)

      1 <?xml version="1.0" encoding="UTF-8"?>
      2 <component>
      3         <name>org.freedesktop.IBus.KKC</name>
      4         <description>KKC Component</description>
      5         <exec>/usr/libexec/ibus-engine-kkc --ibus</exec>
      6         <version>1.5.22</version>
      7         <author>Daiki Ueno <ueno@gnu.org></author>
      8         <license>GPL</license>
      9         <homepage>https://bitbucket.org/libkkc/libkkc/</homepage>
     10         <textdomain>ibus-kkc</textdomain>
     11
     12
     13         <engines>
     14                 <engine>
     15                         <name>kkc</name>
     16                         <language>ja</language>
     17                         <license>GPL</license>
     18                         <author>Daiki Ueno <ueno@gnu.org></author>
     19                         <icon>/usr/share/ibus-kkc/icons/ibus-kkc.svg</icon>
     20                         <layout>jp</layout>
     21                         <longname>Kana Kanji</longname>
     22                         <description>Kana Kanji Input Method</description>
     23                         <rank>77</rank>
     24                         <symbol>あ</symbol>
     25                         <textdomain>ibus-kkc</textdomain>
     26                 </engine>
     27         </engines>
     28 </component>

 /usr/share/ibus/component/simple.xml(us -> jp)

      1 <?xml version="1.0" encoding="utf-8"?>
      2 <component>
      3         <name>org.freedesktop.IBus.Simple</name>
      4         <description>A table based simple engine</description>
      5         <exec>/usr/libexec/ibus-engine-simple</exec>
      6         <version>1.5.19</version>
      7         <author>Peng Huang <shawn.p.huang@gmail.com></author>
      8         <license>GPL</license>
      9         <homepage>https://github.com/ibus/ibus/wiki</homepage>
     10         <textdomain>ibus</textdomain>
     11         <engines>
     12                 <engine>
     13                         <name>xkb:us::eng</name>
     14                         <language>en</language>
     15                         <license>GPL</license>
     16                         <author>Peng Huang <shawn.p.huang@gmail.com></author>
     17                         <layout>jp</layout>
     18                         <longname>English (US)</longname>
     19                         <description>English (US)</description>
     20                         <icon>ibus-keyboard</icon>
     21                         <rank>99</rank>
     22                 </engine>
     23                 <engine>
     24                         <name>xkb:us:intl:eng</name>
     25                         <language>en</language>
     26                         <license>GPL</license>
     27                         <author>Peng Huang <shawn.p.huang@gmail.com></author>
     28                         <layout>us</layout>
     29                         <layout_variant>intl</layout_variant>
     30                         <longname>English (US, international with dead keys)</longname>
	:
5. HeadLessVNCの作成と実行注意:このシェルスクリプトでx11vncを利用する場合、下記行をアンコメントしてください。
     68 #x11vnc -repeat -noxdamage -noscr -clip $WindowSize+0+0 -geometry $WindowSize -forever -shared -noncache -auth /run/user/0/gdm/Xauthority -N -display $TARGET > $VLOG 2>&1 &
     69 #XVNC=$!
     70 #echo "x11vnc PID $XVNC"

    182 #if [ -n $XVNC ]
    183 #then
    184 #       func_signal KILL $XVNC
    185 #       echo "x11vnc $XVNC exited!"
    186 #fi
5.1 ~/bin/HeadLessVNCの作成HeadLessVNCをダウンロードして、~/bin/HeadLessVNCにコピーする。
5.2 ~/bin/HeadLessVNC の実行権付与
$ chmod 755 ~/bin/HeadLessVNC
5.3 ~/bin/HeadLessVNCの実行例
注意:
Xウィンドウのみの黒い画面が表示される場合、 ~/.vnc/xstartup を消去するか、実行権を除去してください。
$ HeadLessVNC :2 gnome-flashback &
$ HeadLessVNC :3 gnome-flashback &
$ HeadLessVNC :4 gnome-flashback &
$ HeadLessVNC :5 gnome-flashback &
5.4 gnome-flashbackを4つ起動した結果
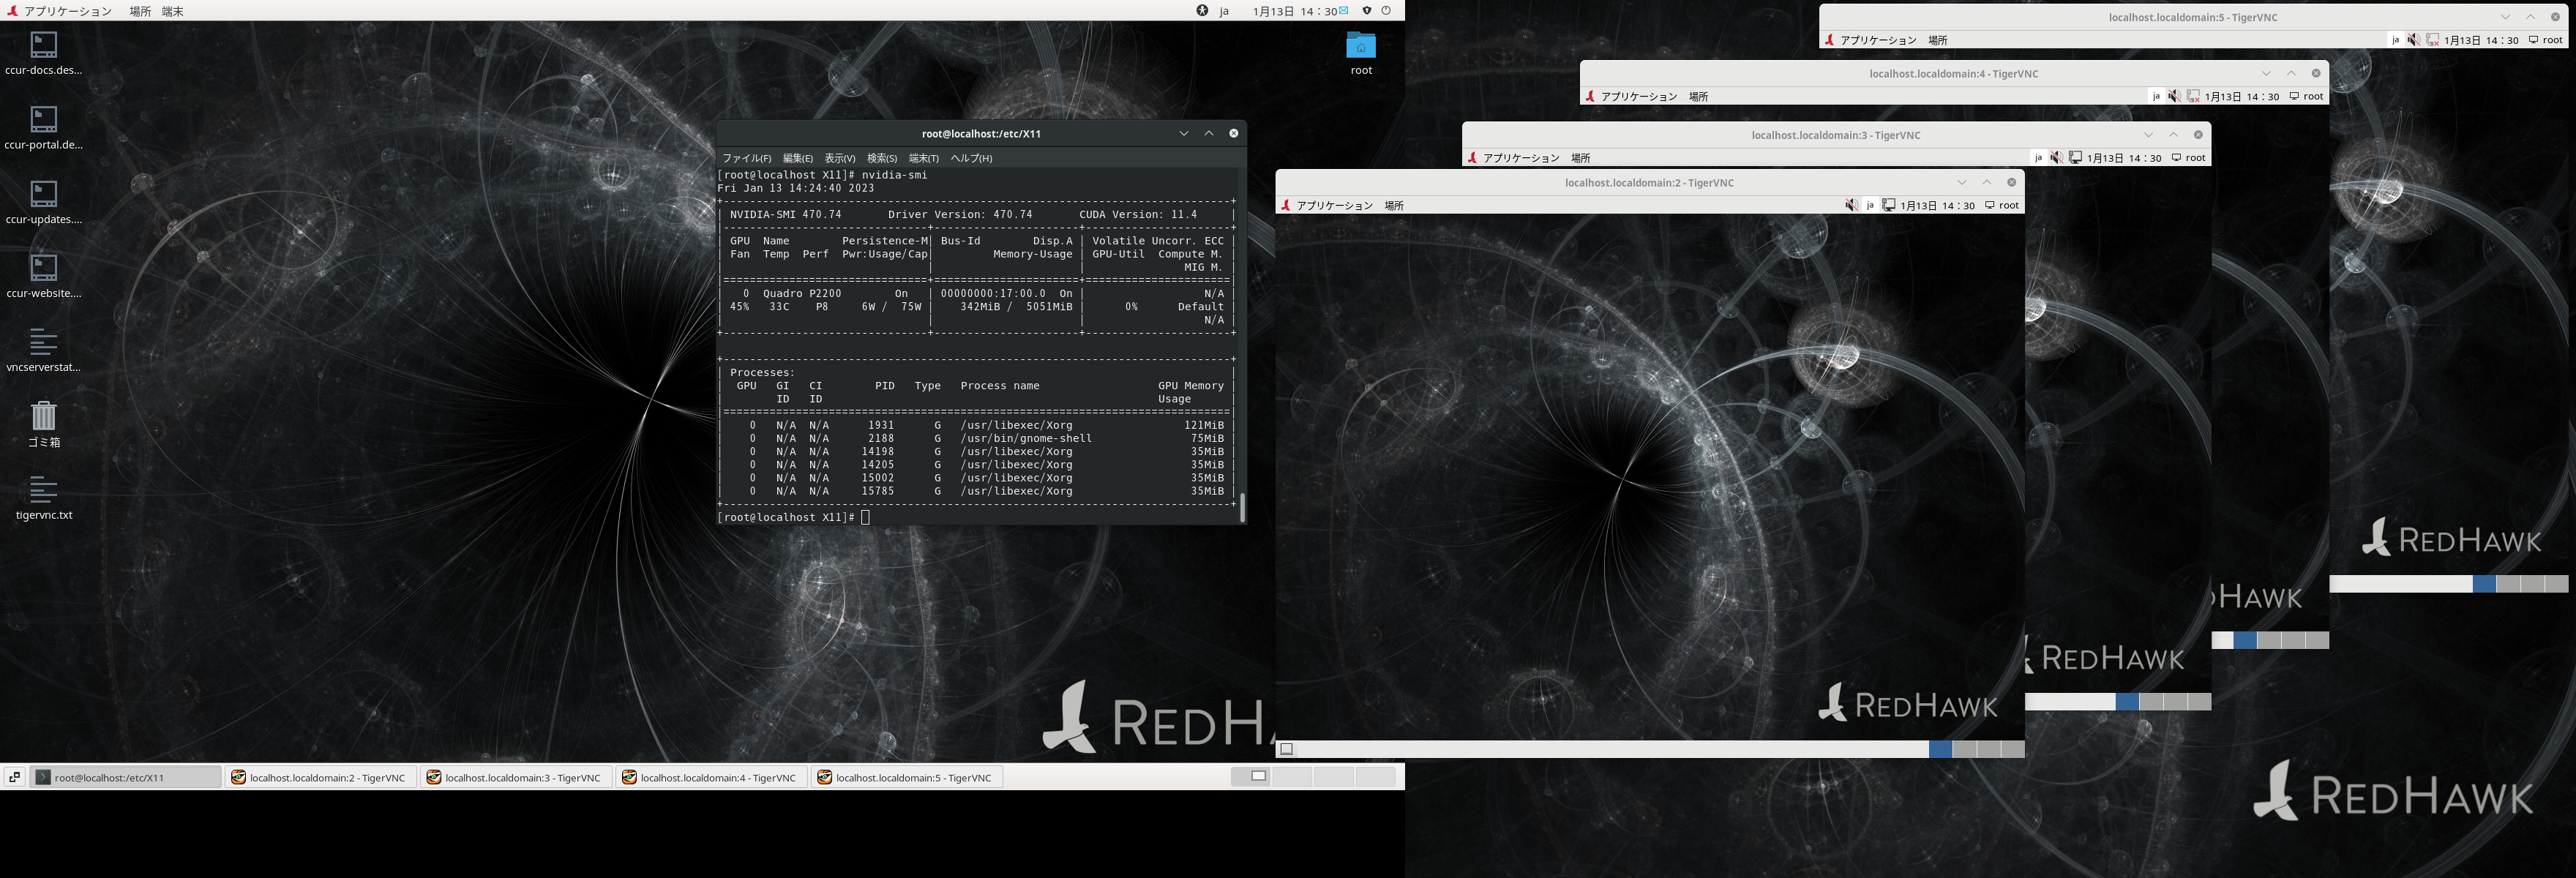
[root@localhost X11]# nvidia-smi
Fri Jan 13 14:24:40 2023
+-----------------------------------------------------------------------------+
| NVIDIA-SMI 470.74       Driver Version: 470.74       CUDA Version: 11.4     |
|-------------------------------+----------------------+----------------------+
| GPU  Name        Persistence-M| Bus-Id        Disp.A | Volatile Uncorr. ECC |
| Fan  Temp  Perf  Pwr:Usage/Cap|         Memory-Usage | GPU-Util  Compute M. |
|                               |                      |               MIG M. |
|===============================+======================+======================|
|   0  Quadro P2200        On   | 00000000:17:00.0  On |                  N/A |
| 45%   33C    P8     6W /  75W |    342MiB /  5051MiB |      0%      Default |
|                               |                      |                  N/A |
+-------------------------------+----------------------+----------------------+

+-----------------------------------------------------------------------------+
| Processes:                                                                  |
|  GPU   GI   CI        PID   Type   Process name                  GPU Memory |
|        ID   ID                                                   Usage      |
|=============================================================================|
|    0   N/A  N/A      1931      G   /usr/libexec/Xorg                 121MiB |
|    0   N/A  N/A      2188      G   /usr/bin/gnome-shell               75MiB |
|    0   N/A  N/A     14198      G   /usr/libexec/Xorg                  35MiB |
|    0   N/A  N/A     14205      G   /usr/libexec/Xorg                  35MiB |
|    0   N/A  N/A     15002      G   /usr/libexec/Xorg                  35MiB |
|    0   N/A  N/A     15785      G   /usr/libexec/Xorg                  35MiB |
+-----------------------------------------------------------------------------+
6. HeadLessシェルスクリプトの一般ユーザでの実行
6.1 /etc/sudoers ファイルの編集
HeadLess構成は、特権ユーザで無いと実行出来ないため、sudoをパスワード無しで実行可能な設定を行う必要があります。
具体的には、以下の行を/etc/sudoers ファイルに追加します。
特権ユーザで作業します
vncuser1 ALL=(ALL)	ALL
vncuser1 ALL=(ALL)	NOPASSWD: ALL
6.2 ~/bin/HeadLessVNC.server ファイルの作成特権ユーザで作業します
HeadLessVNC.serverをダウンロードして、/etc/X11/HeadLessVNC.serverにコピーし、
/etc/X11/HeadLessVNC.server ファイルに実行権を付与します。
# chmod 755 /etc/X11/HeadLessVNC.server
6.3 ~/bin/HeadLessVNC.clients ファイルの作成
特権ユーザで作業します
HeadLessVNC.clientをダウンロードして、/etc/X11//HeadLessVNC.clientにコピーし、
/etc/X11/HeadLessVNC.client ファイルに実行権を付与します。
# chmod 755 /etc/X11/HeadLessVNC.client
6.4 ~/.config/systemd/user/headdless.service ファイルの作成
vncuser1で再ログインして作業します(su - vncuserではエラーになります)
下記の手順で ~/.config/systemd/user/headdless.service ファイルを作成します
$ mkdir -p ~/.config/systemd/user/
$ cat >> ~/.config/systemd/user/headdless.service << EOL
[Unit]
Description=Headless Service

[Service]
ExecStart=sudo /etc/X11/HeadLessVNC.server :2

[Install]
WantedBy=default.target
EOL
6.5 ~/.config/systemd/user/headdless.service ファイルの登録と実行vncuser1で作業します。
[vncuser1@localhost ~]$ systemctl  --user enable headdless.service
Created symlink /home/vncuser1/.config/systemd/user/default.target.wants/headdless.service → /home/vncuser1/.config/systemd/user/headdless.service.

[vncuser1@localhost ~]$ systemctl  --user restart headdless.service

[vncuser1@localhost ~]$ systemctl  --user status headdless.service
● headdless.service - Headless Service
   Loaded: loaded (/home/vncuser1/.config/systemd/user/headdless.service; disabled; vendor preset: enabled)
   Active: active (running) since Tue 2023-01-17 14:03:25 JST; 1min 49s ago
 Main PID: 39034 (sudo)
   CGroup: /user.slice/user-1001.slice/user@1001.service/headdless.service
           ├─39034 /usr/bin/sudo /etc/X11/HeadLessVNC.server :2
           ├─39035 /bin/bash /etc/X11/HeadLessVNC.server :2
           ├─39036 /usr/libexec/Xorg -ardelay 300 -arinterval 25 :2 -sharevts -auth /run/user/1001/gdm/Xauthority -config /etc/X11/headless.conf
           └─39037 x11vnc -repeat -noxdamage -noscr -clip 1024x768+0+0 -geometry 1024x768 -forever -shared -noncache -auth /run/user/1001/gdm/Xauthority -N -display :2
6.6 /etc/X11/HeadLessVNC.clients ファイルの実行vncuser1で作業します。
[vncuser1@localhost ~]$ /etc/X11/HeadLessVNC.client :2 gnome-flashback